Skip to content

Have you ever needed to know what the IP of your router was to get to the management page?
Or maybe you couldn’t get to the internet, and you wanted to make sure you were getting to your router.
We will answer those questions and more. We will also show you how to check on just about any type of device or OS (Operating system).
Find Your Router IP Address On:
What Is A Router IP Address?
Let’s first start with exactly what we are talking about when we say router IP address. With any internet service provider, you will have a modem and a router.
Now depending on the provider this may all be in 1 device, or it could be 2 separate devices.
The modem device is the device that connects you to the outside world (Internet).
The router is what connects you to the inside world, i.e., all your home devices, computers, laptops, tablets, phones, smart devices, and the list goes on these days.
We will be talking about your router IP address. The inside world. This is the group of private IP addresses that all your home devices use to connect to the internet.
I feel there is a need to give a better explanation of why I called these private IP’s. You cannot send these IP’s out over the internet. It just can’t happen.
A long long time ago in a faraway land, well depending how old you are maybe not that long ago. The internet was running out of IP address’. There were 2 separates thoughts to fix this.
One was IPV6 which I still think has never really grabbed everyone. Most network engineers prefer not to use it.
So, there was another solution. The IETF (Internet Engineering Task Force) created RFC 1918 (Request for Comment 1918) This was for the “Address Allocation for Private Internets” in other words private IP addresses that cannot be routed to the internet.
These are those networks:
- 10.0.0.0 – 10.255.255.255 (10/8 prefix)
- 172.16.0.0 – 172.31.255.255 (172.16/12 prefix)
- 192.168.0.0 – 192.168.255.255 (192.168/16 prefix)
Now pay attention to that last one as it will become relevant here soon. We will also discuss some of the other information you see there.
Honestly, we will get to how to find your router IP shortly. Okay if those IP’s are not able to be used on the internet and that is what I am using in my home devices, how do they get to the internet?
Your modem is supplied what is known as a Public IP address. Don’t worry I am not going to go into anymore RFC’s or anything.
Trust me, you have one and it is supplied by your provider. They own it. One other thing to note is that unless you are paying extra that IP changes from time to time.
That public IP is how the rest of the world knows you. Should you ever need to know what that IP is, I will make it easy.
Just type this into your browser:
“what is my IP” and just like that BOOM there it is.
Okay now that we ran down a 40ft rabbit hole lets move on to what you came here for.
How To Find My Router IP Address
1. Microsoft Windows
We will start with the Windows operating system. This will be for Windows 10, 11 and any current version of Windows server. They will all be the same.
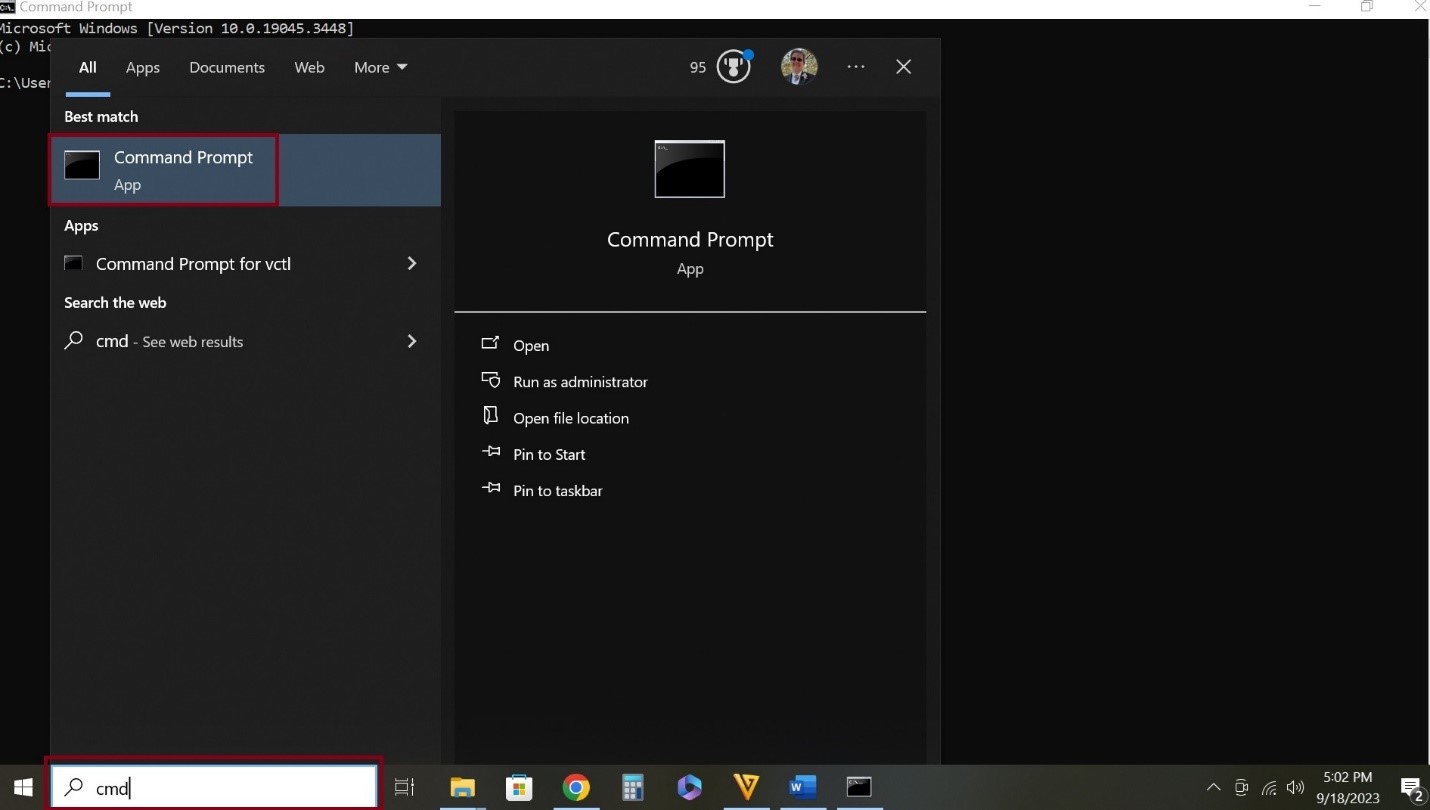
Let’s start with the quickest way. In your search box on the taskbar. By default, it should be on the bottom of your screen.
Type the letters cmd and press your enter key. See the picture above. This will open the Windows command prompt. Which will look like below.
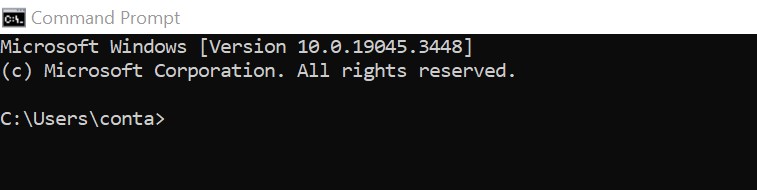
What you type in this box must be exactly like what I will show you. If you know DOS it will help you.
Type in “ipconfig” see the below graphic.
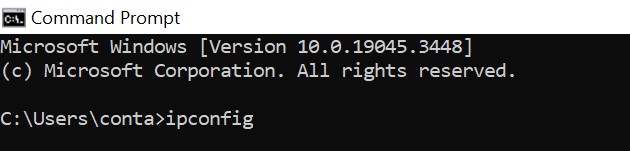
Then hit the enter key.
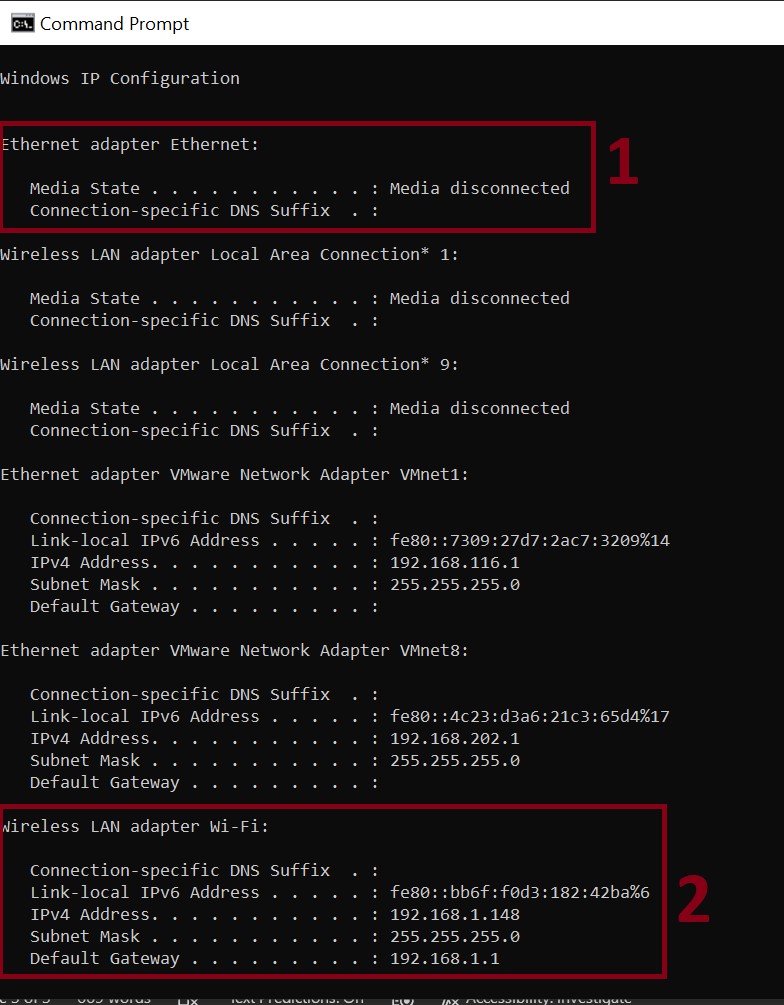
Hey, what is all of that?
Don’t worry you will not have most of that. You should have number 1 or number 2. Number 1 would be if you have a cable plugged directly into your router from your computer.
As you can see I do not. I am running on a wireless network adapter and that is why I have all the information in number 2 above.
Now let’s take a closer look at number 2.
Number 1 above is an IPV6 address. We are not going to cover that here. You do need to be aware that even though we are not using it for this purpose you network adapter is still assigned one.
Number 2 above is the IP address of the device you ran the ipconfig command on. The IP of your computer in this case.
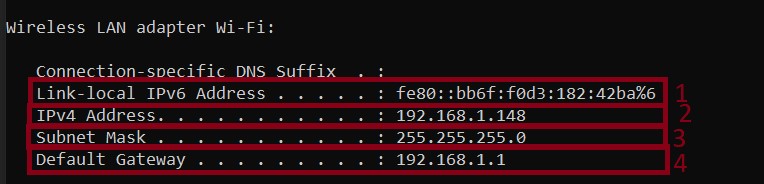
Number 3 above tells your computer how big the IP network is that you are using. The above 255.255.255.0 will be the one you see most of the time. It is also known as a /24 which would look like 192.168.1.0/24.
What that means is that the available IP range is 192.168.1.1 – 192.168.1.254. 192.168.1.0 is reserved for the network and 192.168.1.255 is reserved as a broadcast address.
That is out of the scope of this article to explain. Just know all of your network devices will have an IP address in that range.
Number 4 above is actually the elusive router IP address we have been looking 4. YEA.
But it says default gateway? Yes, and that would be correct from my point of view. Of course, I am a network engineer.
What is meant here by default gateway is simply this is the first place your computer sends all its data that is destined for the outside world. Let’s clarify that a little. This would be the first stop for any information that has to leave your computer.
If you were sending a picture to a printer that is not attached to your computer, then it would also take this same path.
If you had a device that acted as a media server for pictures or video that you would view or watch on your computer, it would do the same. Anything going to the internet would also take this path.
Before we move on let’s cover a couple of other basic commands you can use in the Windows command prompt. The first will be ping. Let’s ping your router IP (default gateway).
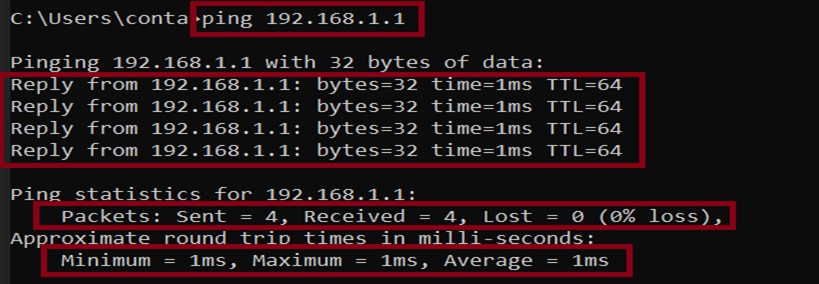
We get a few pieces of information from this. First, we have the command the word “ping” followed by a space and the IP address of what you are checking. In this example we are just testing if we can reach our router by pinging the router IP.
We next see that this sent a ping to the router IP 4 different times, and we see the router replied all 4 times. From this we also see that it was 1ms (millisecond) for the ping to reach our router and for it to reply.
We also see the number of packets sent and received and the percentage of loss. In this case we sent 4 and received 4 so we had 0% packet loss Yea!
We also see the minimum, maximum, and average time that each packet took to go round trip. Try to ping another IP say Google’s DNS (domain name server) 8.8.8.8. Also add what we call a switch.
Let’s add a -t. ping 8.8.8.8 -t. This will send a continuous ping to the server, and you will see bigger numbers for time, and they will also not always be the same. You will have to hold your control key + the c key to stop this. You may have to do it more than once.
Let’s cover one more troubleshooting command before we move on. It would not show you much if we ran it to your router IP, so let’s use Google again.
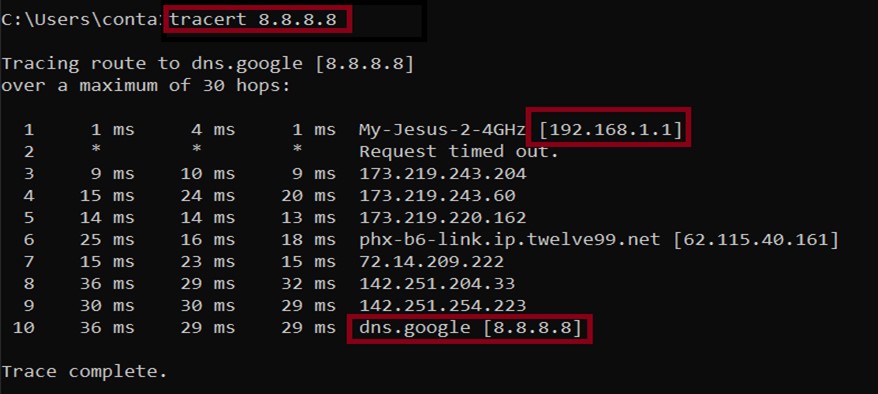
First, we see the command, tracert 8.8.8.8. This is a trace route command. We can use this to see what path our data takes to get to any public server on the internet. We can also use a domain name such as www.google.com.
Go ahead and try it and it will even give you the IP address that goes with it. Now what is interesting is my public IP is not in that list.
All the other IPs in 3 through 9 are all out on the internet. You can even search for these IPs in your web browser and you can find who owns them.
Okay to close out Windows I will show you a couple of other ways you can look for your router IP address.
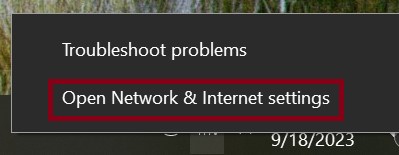
You can left click or right click on your network connection in the system tray.
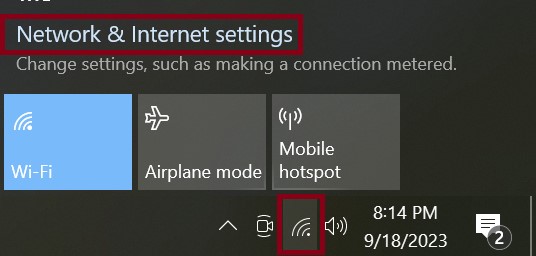
Then you can click on Network and Internet settings.
This will open the Status window. Scroll down to advanced settings.
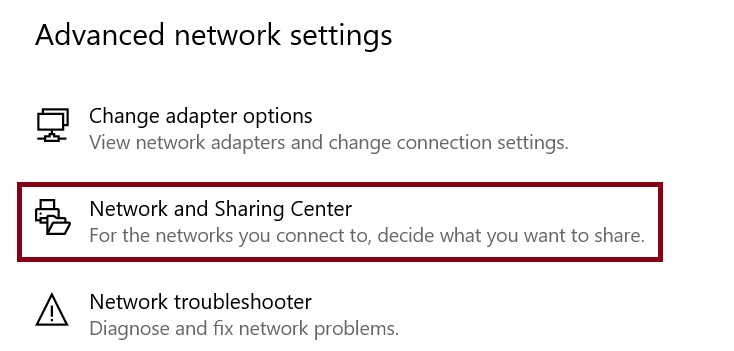
Select network and sharing center. This will open the network sharing center.
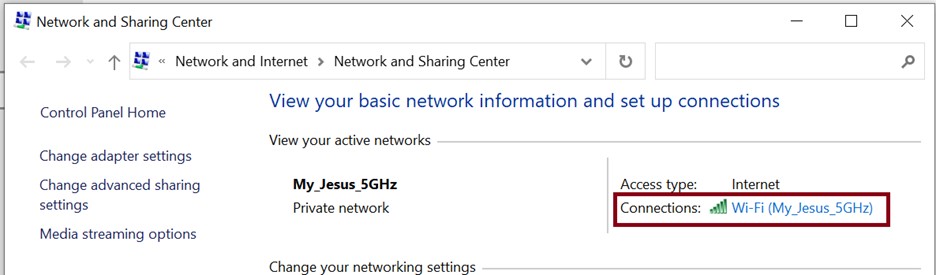
Click on the active connection. In my case this will open the wi-fi status screen. If you are connected directly to your router with a cable it will bring up that connection.

Click the details button and that will bring up network connections detail screen.
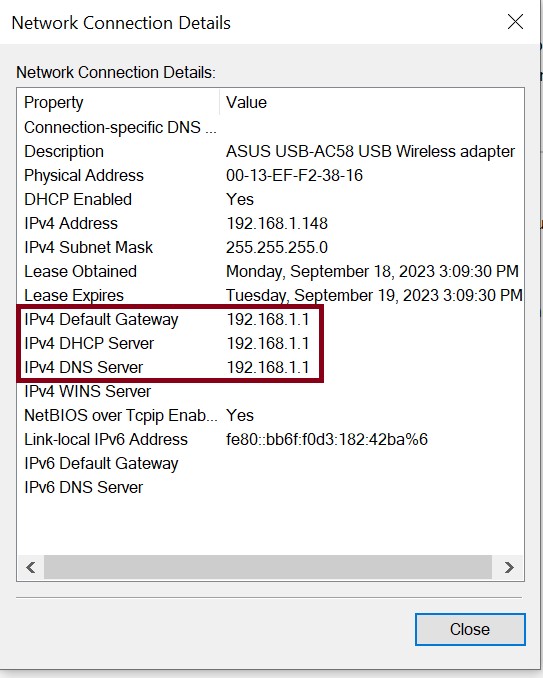
There you see my router IP (default gateway) and in my case you also see it is my DHCP server. This assigns IP addresses to all of my network devices automatically.
It is also my DNS (domain name service) server. So, when I type in www.google.com the DNS tells it what IP address that is.
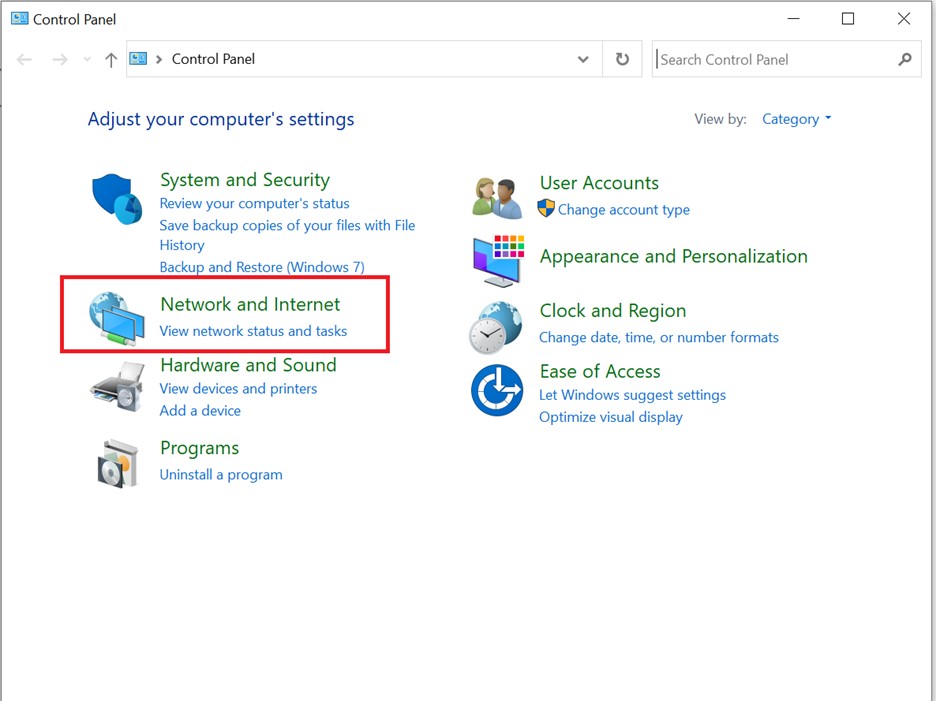
You can also get to the Network and sharing center through the control panel. Just type control panel in the search box like we did for our command prompt. Click on network and internet.
Then click on network sharing center.
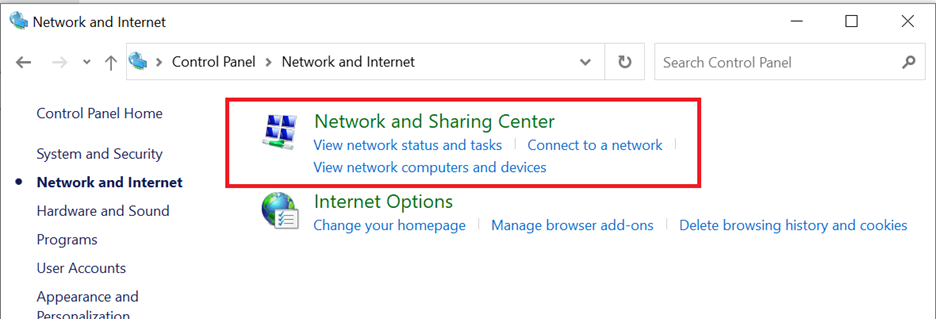
Then you can follow the same path ae we did above.
As you can see in windows there are many ways to get the same information. I would always use the command prompt as it is the quickest.
I covered extra detail in this section so we will not have to cover it in the coming sections for the other device types and OS versions.
I will also not be covering all the different ways to get your router IP. It will be quick and dirty from here on out.
2. Mac OS X
As I said this will be just showing how you can get there without all the extra information except where it is required. I will be using version 11 of the Mac OS. Other versions should be similar.
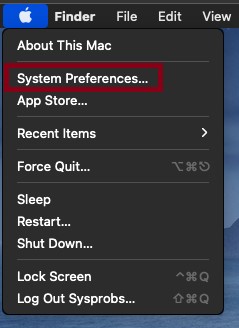
For the first way we will be using your dock bar. It is handy after all. Click on system preferences. It is the one below with the red box around it.
If you are not sure just hover your mouse over it and it will have a tool tip.

In the system preferences window click on the network icon.
![]()
The network window below will appear. Just as a note if you have more than one network connection be sure you select the active one.
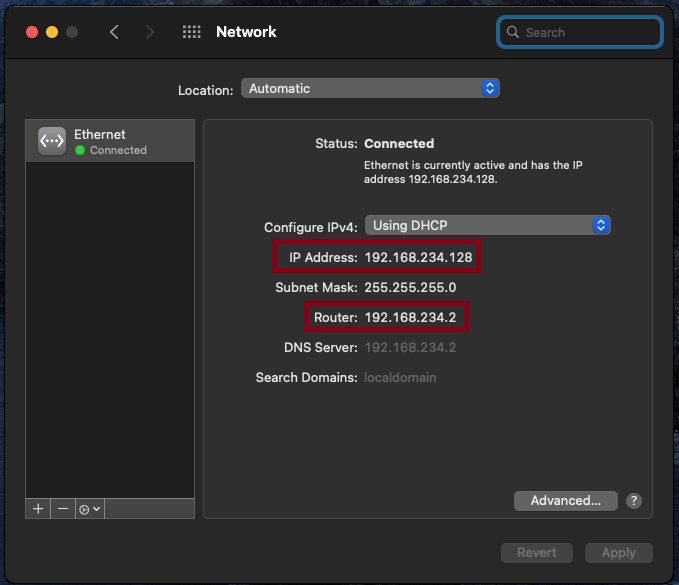
Now this will look a little different than windows as Mac uses a little different naming convention. IP address is the same. That is the IP of the device you are on. Now instead of using default gateway Mac uses Router.
So, in my case my Router IP would be 192.168.234.2. Normally no matter what Router you use you will have a .1 as your default gateway. This is a VM (Virtual Machine), so it is a little different. Just know whatever is in the Router line that will be your router IP.
Now if for some reason system preferences is not on you dock, there is another way.
Just click on the little apple in your menu bar. Low and behold there it is. Click on system preferences and follow the pictures above.
Now I wanted to show you how to find it in the terminal window which would be like the windows command prompt.
As I will show you in a moment it does not actually show you the router IP. Let’s go to the terminal prompt.
If you have not opened it for awhile or if you have never opened it. It will not show on your dock like mine below. It is the red box on the right below. So, we will use your Launchpad instead. It is the red box on the left.

Once your launchpad is open just click on the terminal icon.
![]()
Now we can’t let Mac be out done by windows we have another way to get there. Let’s go back to your menu bar and click on go.
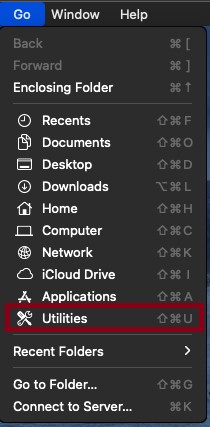
Then click on utilities and that will bring up the utilities window and you can see the terminal is there as well.
So now that we have the terminal window open let’s try the Mac version of ipconfig. Which is ifconfig.
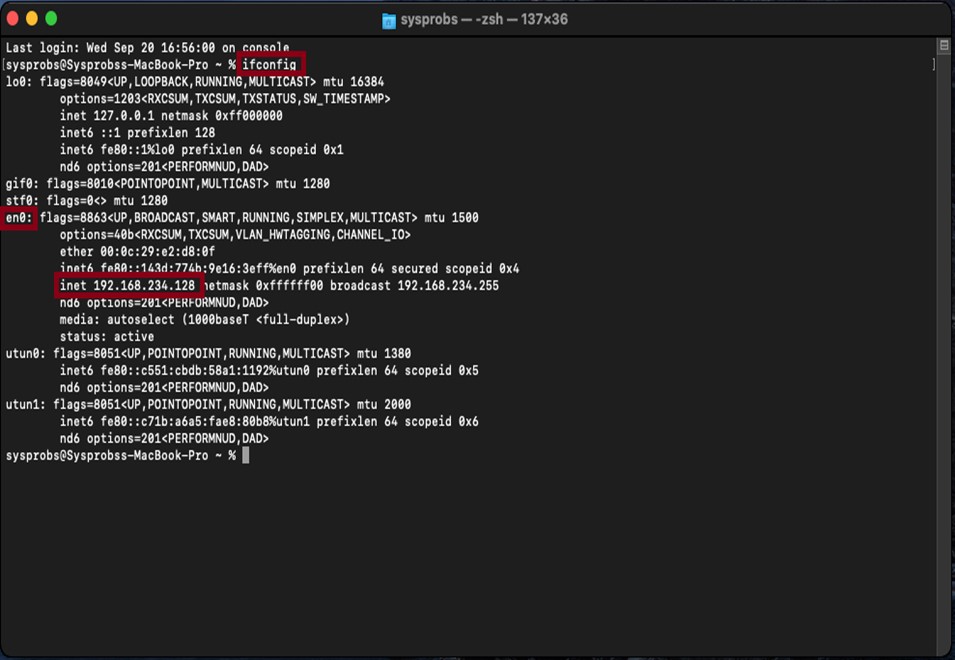
After you hit enter you will see the screen above. You can skip lo0 as this is an internal network connection to Mac. What you are looking for is the en0. If you go to the line that says inet it will have the IP of the device, you are on.
As you can see it does not show your router IP. Now you could make the guess using that IP that it would be the .1. As we have seen earlier in my case it was actually .2.
We can also use the ping command here. Let’s ping our friend google. This time we will ping www.google.com.

So, we typed: ping www.google.com. You can see it also gave us the IP along with all the other information that was in Windows command prompt.
No need to use a -t here. It will continue to ping until you hit ctrl+c. You can also do a trace route here by typing traceroute www.google.com.
That covers it for MAC let’s move on to Linux.
3. Linux
There are a million flavors of Linux out there. We are going to use Ubuntu 22.10. We will start with what I found to be the quickest way.
On what I will call the system tray you will find an Icon that looks like 3 little computers networked together. When you click on it the following window will appear.
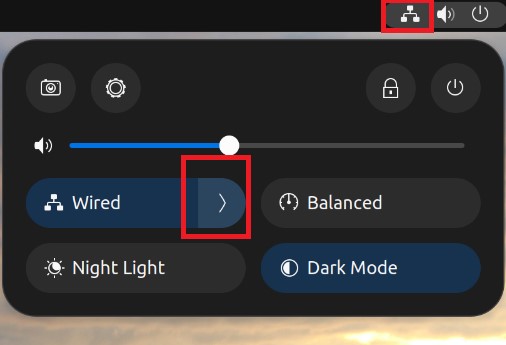
Next click on the arrow next to wired. Yours could say wireless. Then it will look like this.
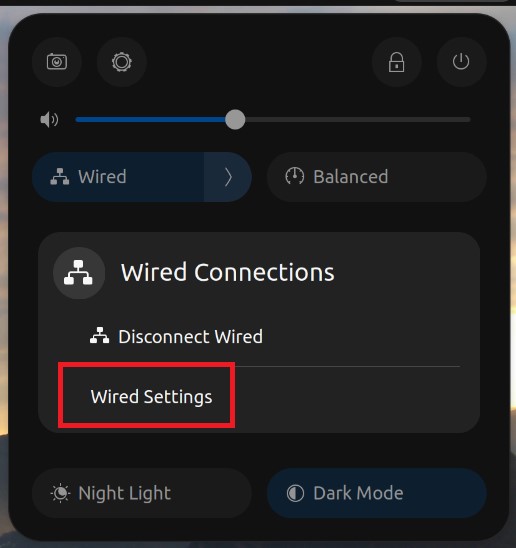
Click on Wired Settings and it will bring up Settings\Network.
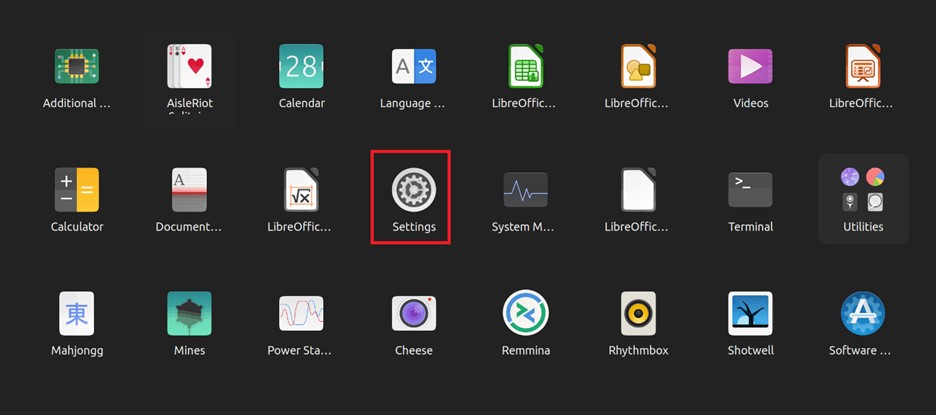
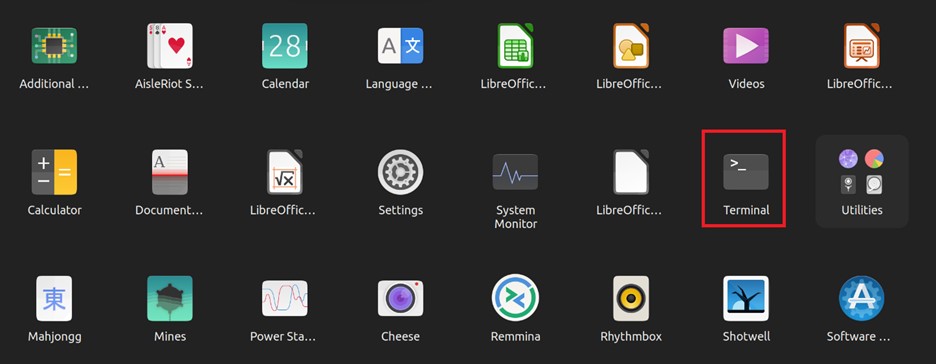
Now you can also get here by going to your dock and clicking on the show applications icon.
This will open a window showing all your installed applications. Just click on the settings Icon.
Now that we are back here. Click on the gear icon next to your wired or wireless connection depending on your computer setup.
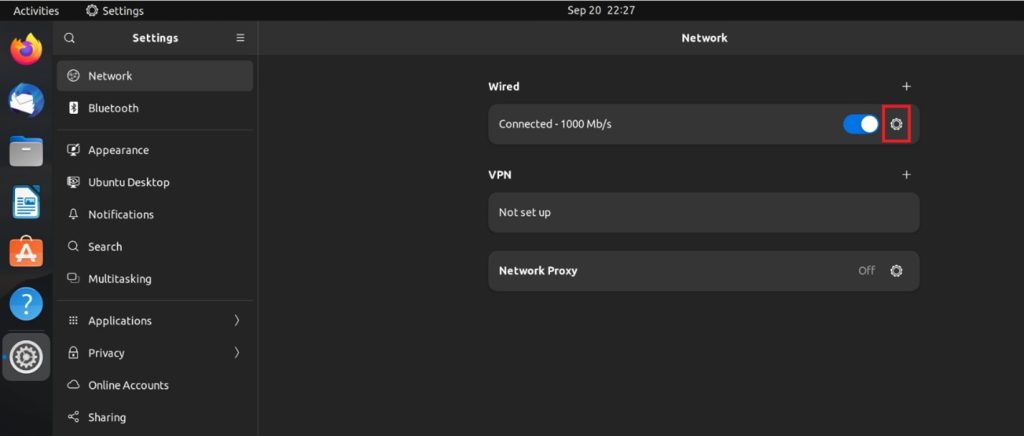
Now we have finally arrived at the location we have been looking for.
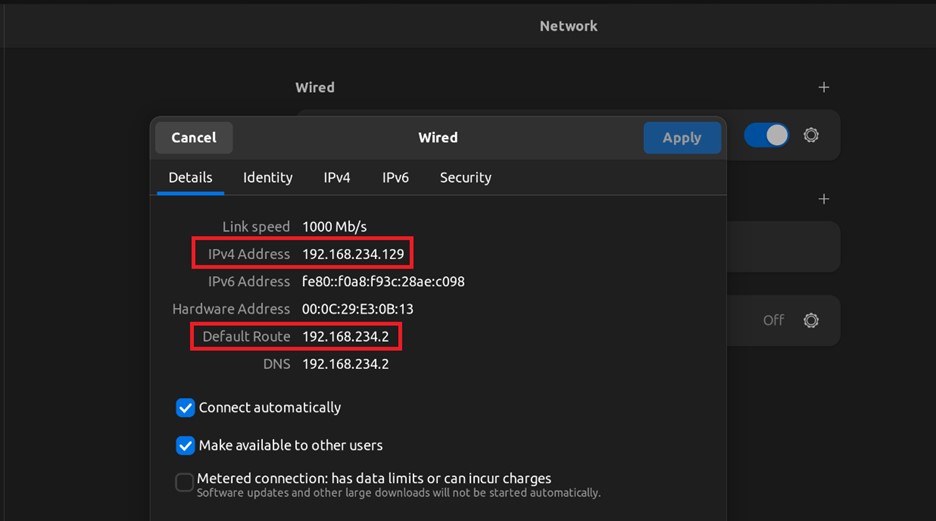
As you can see Linux uses a slightly different naming structure. IPv4 Address would be the IP of your device you are on.
We also see Default Route which would be your router IP. I guess they kind of combined Windows and Mac together here.
Now we can also open a terminal window on Linux. Just go back to your dock and click on the show applications icon again. Except this time, we will select the terminal icon.
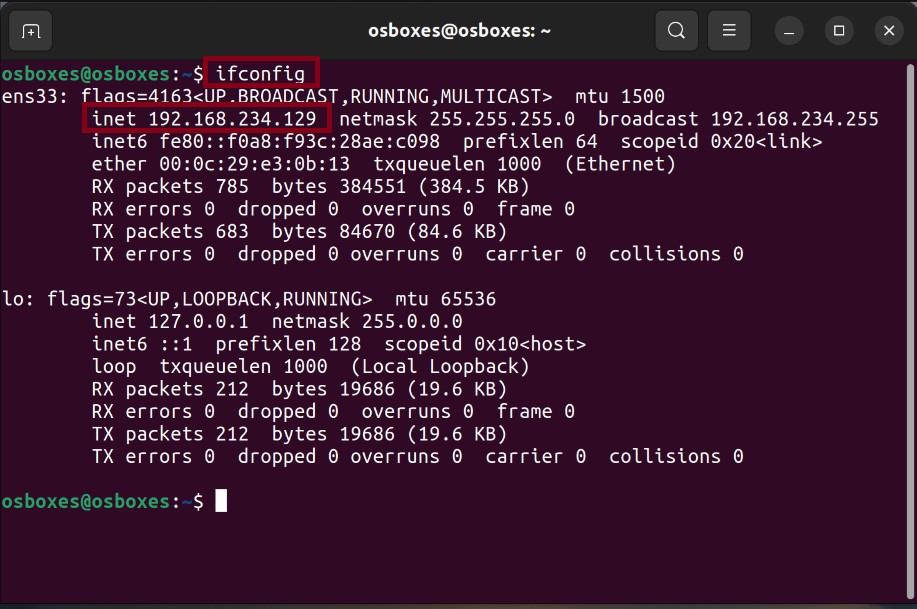
Now they have the same ifconfig command as Mac, so again it will not give you your router IP address. Just to note the ifconfig may not already be installed.
Just copy and paste apt-get command it will show you. I will also not show you the traceroute command as it was not working on this virtual machine.
The command is the same as Mac just type in traceroute 8.8.8.8. We will do a quick ping command and that is already installed by default.
As you can see ping is the same across all 3 OS types. The only difference is that on Mac and Linux it will run until you hit ctrl-c.
Where with Windows if you want it to keep running you must add the -t switch to it.
I know there are many flavors of Linux and hopefully this will get you in the right direction. We will close Linux here and move onto Chrome OS.
4. Chrome OS
Here we are with Chrome OS. We are going to cover one way to get the information. Also, we will not be covering items like ping and trace route. There’s an APP for that.
For Chrome OS we will start in the system tray in the bottom corner, and we will click on the area that shows your time and internet connection.
After you click that your screen should look like below.
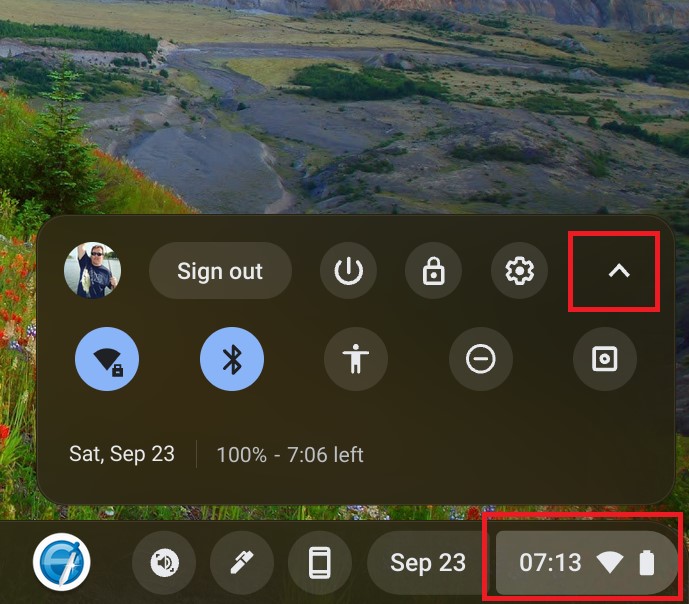
Click on the up arrow that is marked above to expand this window and you will be at the below screen.
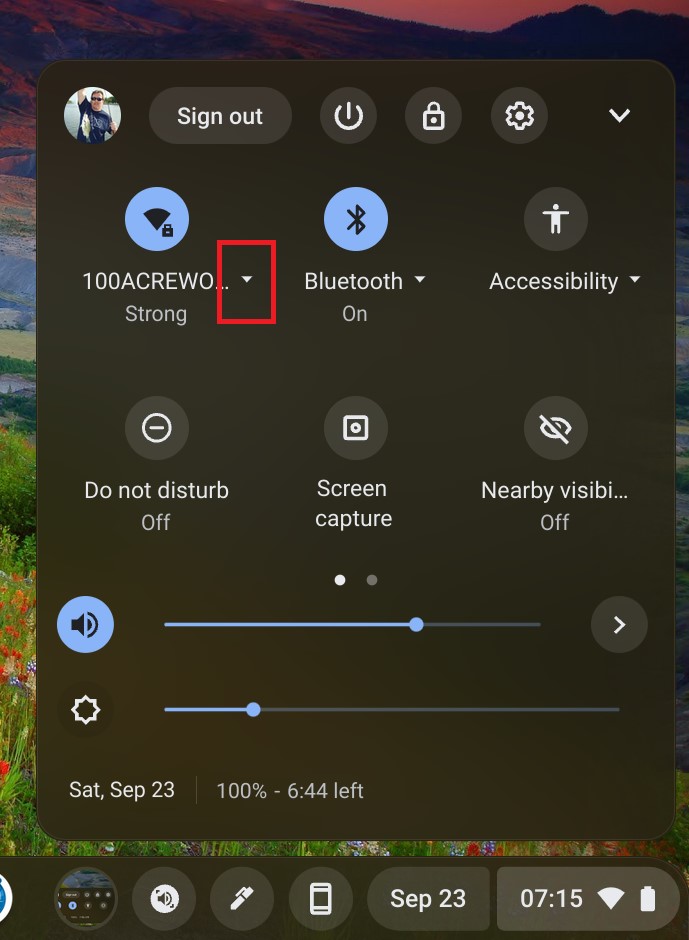
Next to your internet connection the is a down arrow. Click on this and you will be taken to the Network screen as seen below.
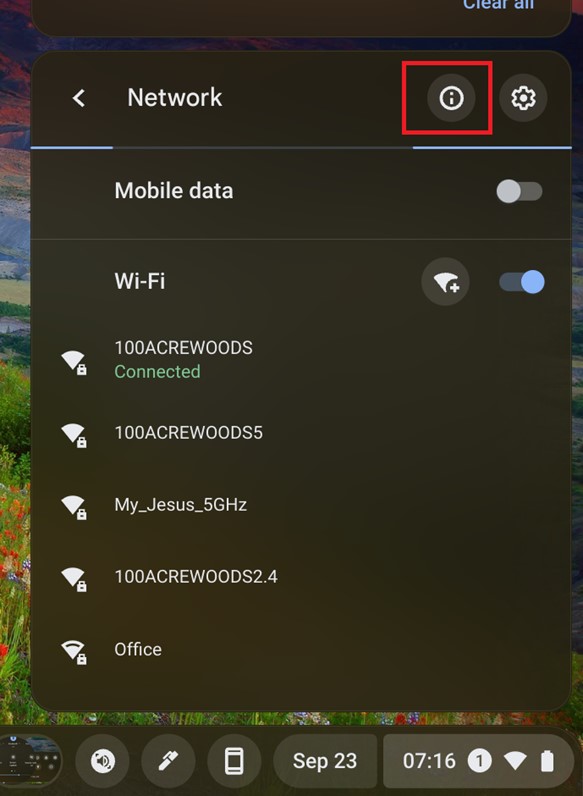
Now we can do 2 things from here. First off if you are just looking for the IP address of your device click on the information button as marked above and you will get a tool tip screen as shown below.
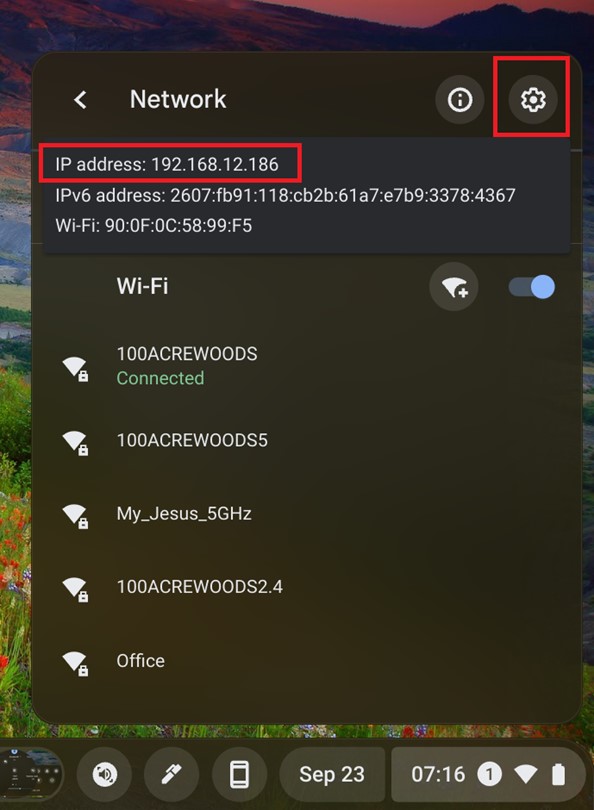
Marked above is your device IP but that is not what we are looking for, so we are going to click the gear icon as marked above.
This will bring up your network settings screen. See below.
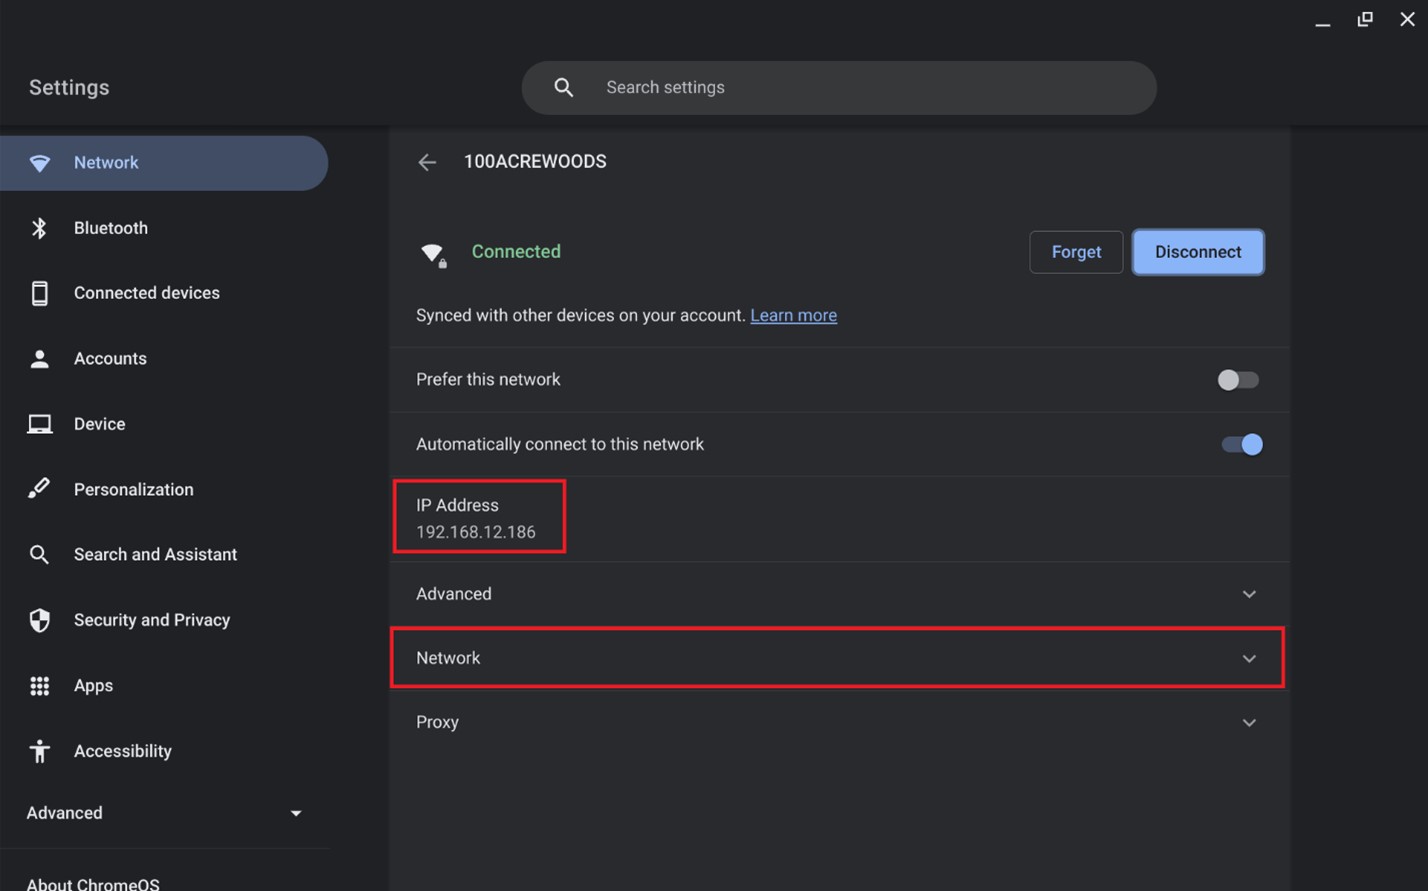
Again, you will see the IP address of your device. Well, this is still not what we are looking for so we will need to click on the down arrow next to network to expand this part of the window.
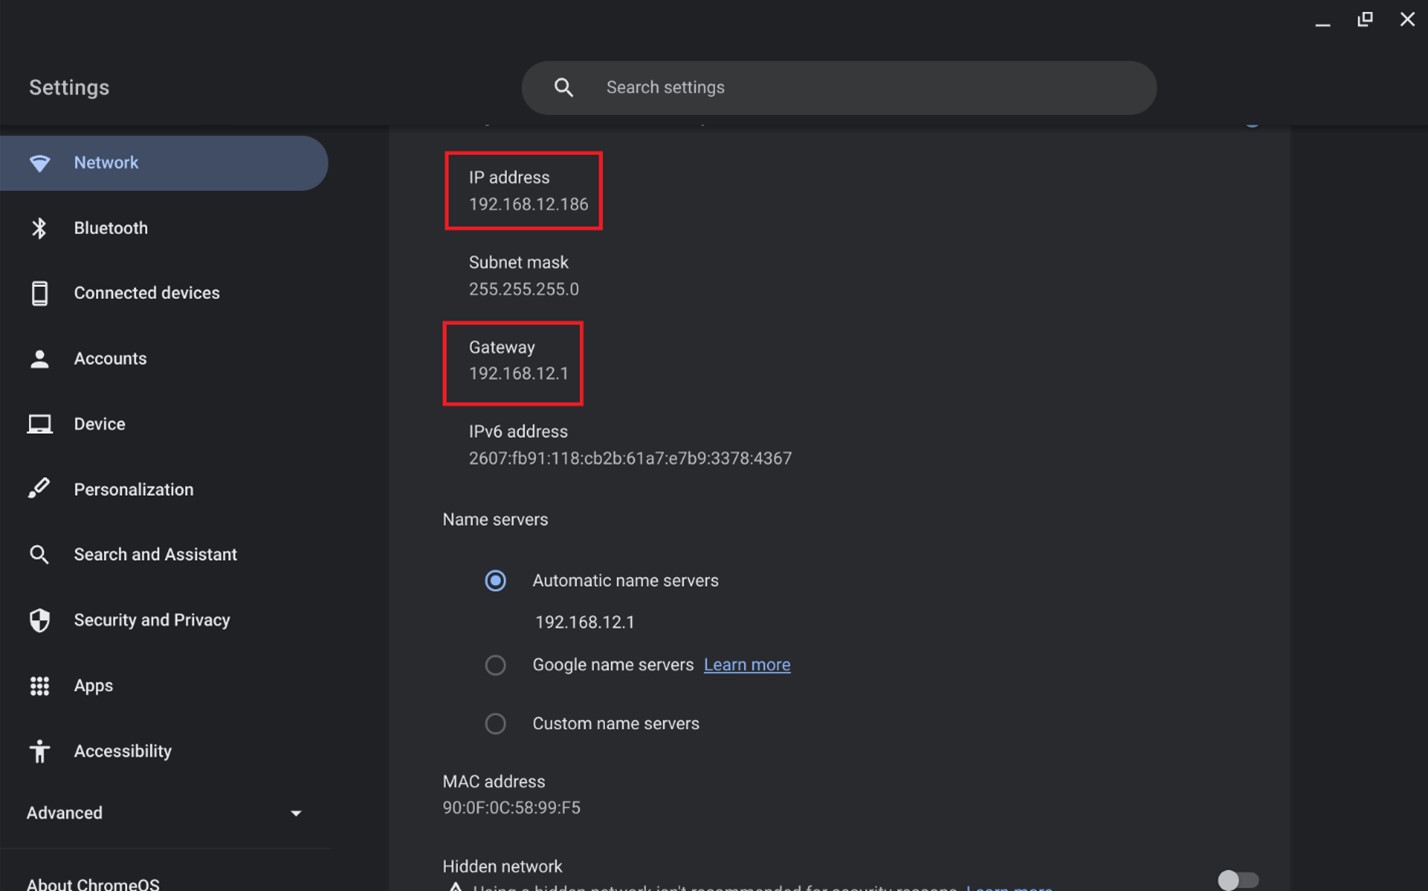
Finally, when we got there. You will have your device IP, DNS settings, Subnet mask, and yes, we have your router IP. As you can see above Chrome has just decided to call it the gateway.
This will be your router IP. Just to note you can always go directly to your settings if you have a shortcut for this on your desktop or in your tray. Just go to network from your settings screen. Now we will move on to Android.
5. Android
We are just going to use my phone as it has the latest version of Android on it. I keep a shortcut to my settings on one of my desktops.
You can also get there by pulling down on your notification bar and clicking on the gear icon or you can go to your list of apps installed and click on settings there.
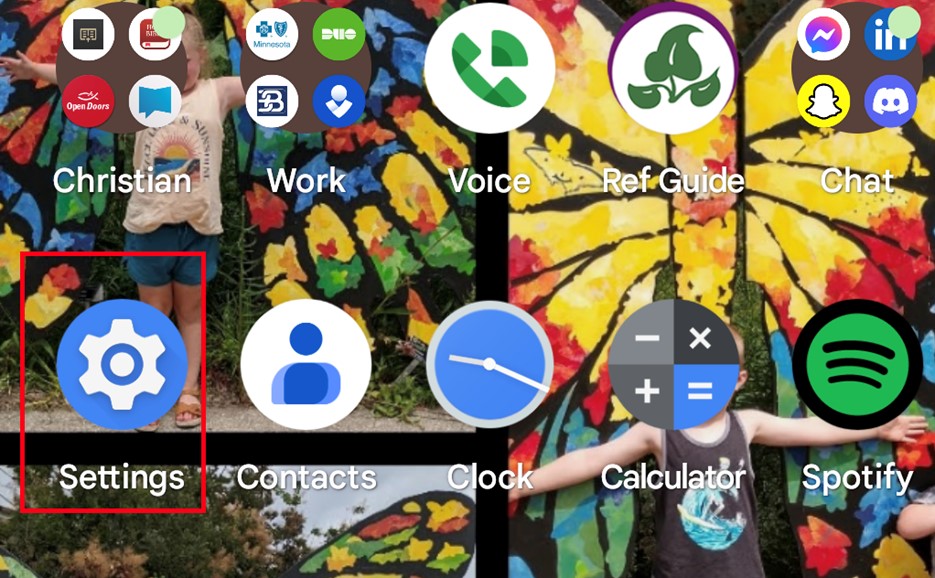
This will bring up all your settings.
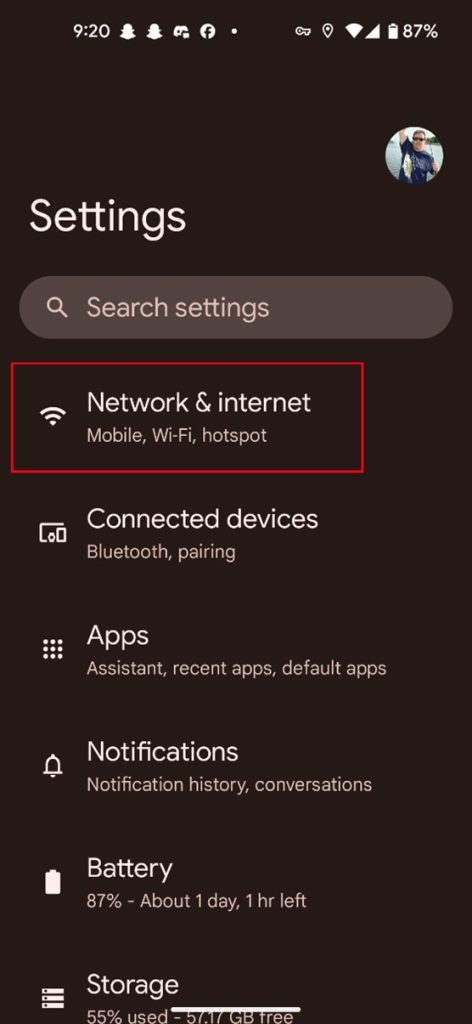
Click on Network and Internet. Which will bring up the next screen.
Click on internet as shown above. I guess at this point I should point out that you must be connected to your router, or this will not show up. Make sure you are connected to your home Wi-Fi. This will bring up the next screen.
Under WI-FI find the one that shows connected then click on the gear icon to the right of it and this will bring up the network details screen as shown below.
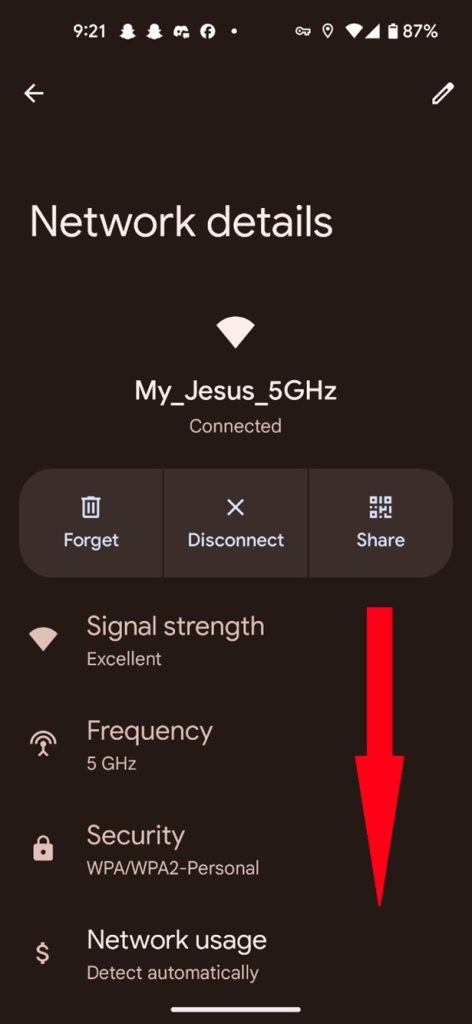
There is a lot of information on this screen so you will have to scroll down to get to what we are looking for. There will be a section called Network Details. See below.
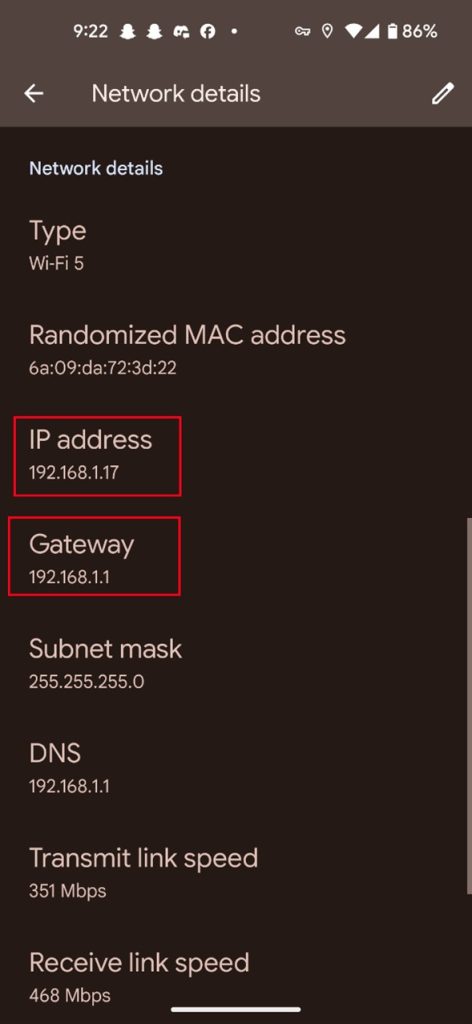
Here we are! You will see your device IP Adress along with the Gateway IP address. Just like Chrome since this is also a Google product, we see the router IP is just simply labeled Gateway.
You will see your DNS, subnet mask along with your actual transmit and receive speed. That would be upload and download in that order.
That will wrap up our Android section and we will do one more. Next up Apple.
6. Apple IOS
Apple will be the last one we cover here. We will be using an IPAD with the latest version of IOS. Sorry, these will not be the best screenshots as I had to borrow a device and use my phone to get them.
I did find this was one of the easier devices to get the router IP on. What we are looking for is in your settings. Like the picture below it can be on your dock, and you might have a shortcut on your desktop.
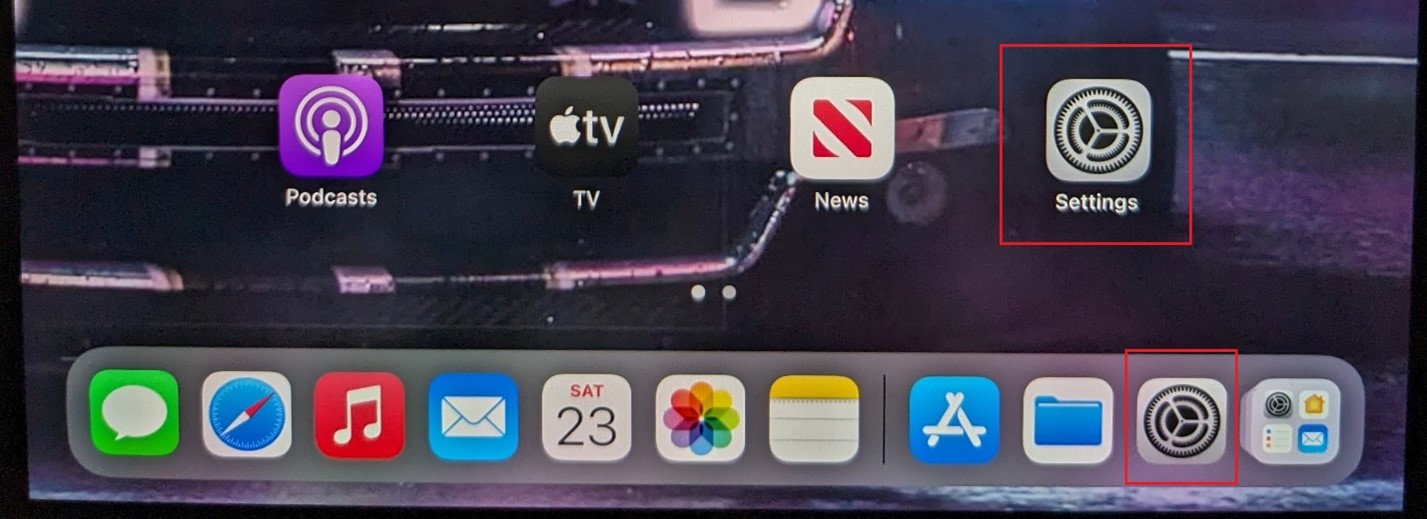
After you click on the settings ICON you will see the next window.
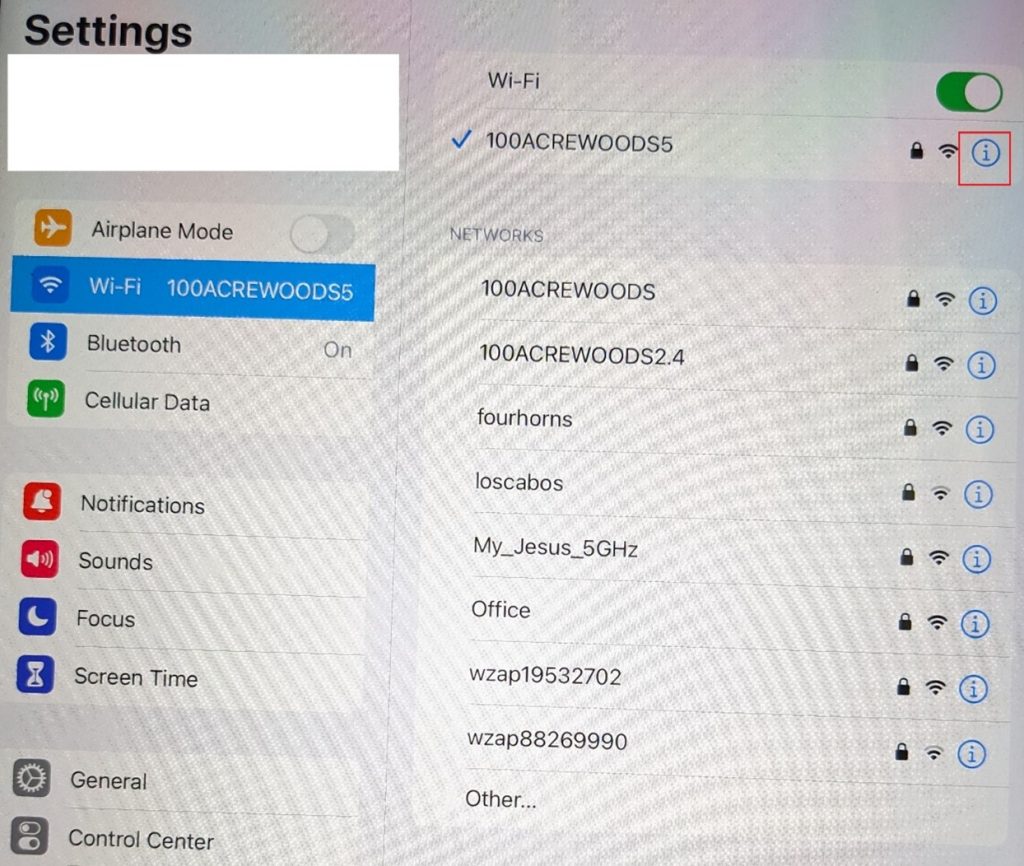
On the right side under WI-FI the first line will be the network you are connected to. Just click on the information icon marked above to get to the next window.
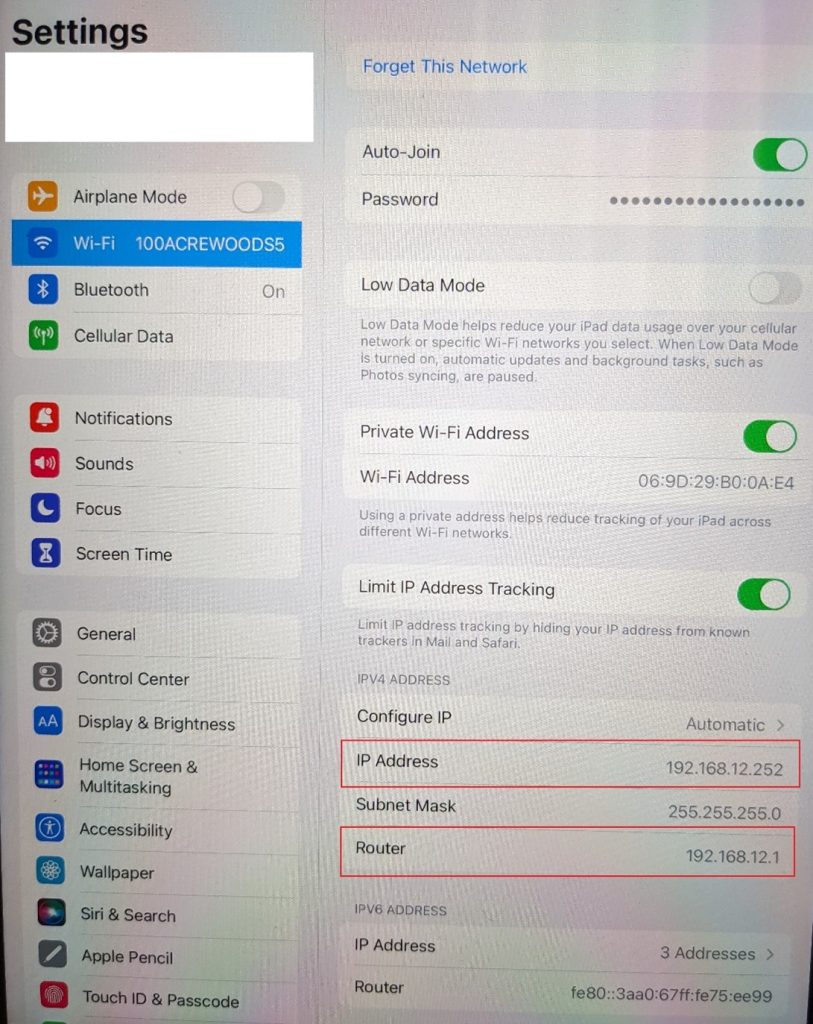
Here we are already. On the right-hand side, you will see the IP address of your device.
Since we are on Apple IOS you will see your Router IP simply labeled as Router just like we did in MAC OS. That was quick and simple.
Final Words
In closing we have looked at 6 different operating systems and how to lookup the IP address of your Router.
This will have covered many different types of devices as it is the OS that determines just how we go about doing this.
It would be impossible in an article to cover every OS and every type of device. Our hope here is to give you the main players so you will be able to find it on your own no matter what OS or device type you have.
Thank you for your time and Happy Networking.