Skip to content
Introduction to Best Home Lab Network Topologies
Building a home lab is a rite of passage for IT professionals, offering hands-on experience with networking, virtualization, and security. However, designing an efficient network topology—the layout of devices and connections—is critical for success. This guide explores three beginner-friendly topologies, actionable tips, and free resources to help you create a robust home lab.
3 Best Home Lab Network Topologies
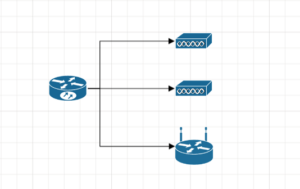
1. Star Topology: Simplicity and Scalability

A star topology connects all devices to a central hub, such as a router or switch. This setup is ideal for beginners due to its simplicity and ease of troubleshooting. Think of your standard home network.
How It Works:
- Devices (e.g., servers, PCs) link to a central switch.
- Data flows through the switch, minimizing collisions.
- Easy to expand by adding new devices to the hub.
Pros:
- Low cost (uses fewer cables than mesh setups).
- Isolated failures: A single device issue won’t crash the network (unless it’s your router or switch that dies)
- Perfect for small labs (e.g., 5–10 devices).
Cons:
- Central hub failure disrupts the entire network.
- Limited bandwidth for high-traffic scenarios.
- Limited opportunities to play with advanced concepts like Spanning Tree Protocol, failover, and load balancing
Easy Expansion Options:
- Insert a hardware firewall between your router and switch, or install a software firewall on your router to allow for more advanced security experimentation
Free Tool: Use Cisco Packet Tracer to simulate star topologies before deploying.
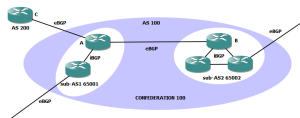
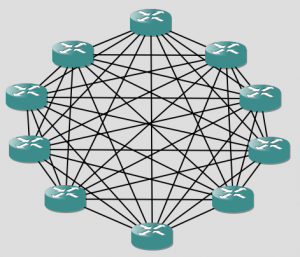
2. Hybrid Topology: Flexibility and Experimentation for Growing Labs

A hybrid topology combines elements of star, mesh, and bus layouts, offering flexibility for labs that host diverse workloads (e.g., virtualization, IoT). It allows you to experiment with building redundancy into your home lab and setting up Spanning Tree Protocol,
Example Setup:
- Core: Mesh connections between switches and access points.
- Edge: Star topology for easy expansion and minimal cable management hell.
- IoT devices: Segregated into a separate VLAN (Virtual Local Area Network).
Why Choose Hybrid?
- Balances cost, performance, and scalability.
- Supports network segmentation (e.g., separating lab traffic from personal devices).
- The ability to experiment with more advanced networking concepts
Easy Expansion Options:
- Grab an old laptop or desktop computer and configure it as a DHCP or email server to add it to your network
3. Virtualized Topology: Software-Defined Networking (SDN)
For labs focused on virtualization platforms like Proxmox or VMware ESXi, an SDN approach lets you manage networks programmatically.
Key Components:
- Hypervisor: Proxmox VE (free, open-source).
- Virtual Switches: Create isolated networks for VMs (Virtual Machines).
- pfSense Firewall: Route traffic between VLANs and secure lab environments.
Benefits:
- Reduced hardware costs (run multiple networks on one server).
- Experiment with SDN principles like automated traffic routing.
- The ability to save configurations and switch between them easily. It’s great to be able to load an entire virtualized network from a backup file to run an experiment without having to physically rearrange hardware and break your perfect cable management.
Actionable Advice for Home Lab Success
Designing and maintaining a home lab network is a rewarding journey for IT professionals, offering invaluable hands-on experience with real-world networking concepts. Here’s a comprehensive, actionable guide to help you build, secure, and optimize your home lab for both learning and practical use.
1. Start Small and Build Incrementally
Begin with a simple setup—such as a star topology connecting just two or three devices—and expand as your confidence and needs grow. This approach helps you understand core networking principles without being overwhelmed by complexity. As you add devices or services, document each change and test connectivity at every stage. This incremental method makes troubleshooting easier and ensures you understand the impact of each addition.
2. Plan Your IP Addressing and Subnets
Carefully plan your IP address schema and subnet allocation before connecting devices. Use private IP ranges (like 192.168.x.x or 10.x.x.x) and divide your network into logical subnets. For example, you might allocate:
- VLAN 1 (e.g., 192.168.10.0/24) for IoT devices
- VLAN 2 (e.g., 192.168.20.0/24) for general testing
- VLAN 3 (e.g., 192.168.30.0/24) for lab servers
Subnetting improves performance by reducing unnecessary broadcast traffic and enhances security by isolating device groups. Implement VLANs (Virtual Local Area Networks) on your managed switch to segment traffic and enforce access controls between device types.
3. Choose the Right Hardware and Topology
Select affordable, reliable hardware that supports your learning goals. For most beginners, a managed switch (such as a TP-Link or Netgear model), a capable router, and a few old PCs or Raspberry Pi boards are sufficient6. If you plan to experiment with virtualization, ensure your main server or PC has enough RAM and CPU cores to run multiple virtual machines.
For physical layout, keep your cabling organized and labeled. Use cable wrap labels or a label maker to identify each connection, which will save time during troubleshooting and future expansions.
4. Leverage Virtualization and Cloning
Virtualization platforms like Proxmox VE or VMware ESXi allow you to run multiple virtual machines (VMs) on a single physical server, simulating complex networks without extra hardware. Use VM cloning features to quickly deploy new test environments—set up a “golden image” VM with your preferred OS and tools, then clone it as needed for experiments. This saves time and ensures consistency across your lab.
5. Prioritize Security from Day One
Security is crucial—even in a home lab. Start with these best practices:
- Deploy a firewall (such as pfSense or OPNsense) to monitor and control network traffic.
- Use VLANs to isolate critical devices from less trusted ones (e.g., keep IoT devices separate from lab servers).
- Enable SSH key authentication and disable password logins on all servers.
- Change default ports for remote access services (e.g., SSH) to reduce automated attack attempts.
- Keep all devices updated with the latest security patches.
- Avoid exposing your home lab directly to the internet unless necessary; if you must, use a VPN for secure remote access.
- Regularly back up configurations and critical data.
6. Monitor and Visualize Your Network
Implement open-source network monitoring tools to gain visibility into your lab’s health and performance:
- Zabbix and Nagios Core: Monitor device status, bandwidth, and resource usage.
- Cacti and Grafana: Visualize traffic trends and system metrics.
- LibreNMS and Icinga: Receive alerts for outages or unusual activity.
Monitoring not only helps with troubleshooting but also teaches you how enterprise-grade systems are managed.
7. Document Everything
Maintain thorough documentation of your network layout, IP address assignments, VLAN configurations, and device credentials. Use spreadsheets, diagrams, or network mapping tools. Good documentation is invaluable for troubleshooting, scaling, and sharing your setup with others.
8. Optimize Lab Location and Environment
Choose a location for your lab with good ventilation, low noise, and enough space for expansion. Overheating can shorten hardware lifespan, so ensure adequate airflow around devices. If possible, use a dedicated room or basement to minimize disruptions and keep your workspace organized.
9. Experiment with Advanced Features
Once you’re comfortable with the basics, try advanced networking concepts:
- Set up a VPN (Virtual Private Network) for secure remote access to your lab.
- Explore containerization and orchestration with Kubernetes (using k3s for lightweight deployments).
- Practice with network simulation tools like GNS3 or Cisco Packet Tracer before making changes to your physical lab.
10. Engage with the Community and Keep Learning
Leverage online communities, forums, and tutorials to solve problems and discover new ideas. Platforms like Reddit’s r/homelab, YouTube, and IT blogs are rich sources of advice and troubleshooting tips.
Conclusion
Choosing the right home lab network topology—whether star, hybrid, or virtualized—sets the foundation for a functional and secure home lab. By starting small, leveraging free tools, and prioritizing segmentation, even beginners can build enterprise-grade setups.