Skip to content

Introduction
I remember when I started my career in the IT industry and I visited the network operations centers of some banks. There were usually these big screens hung up on the wall for everyone to see showing several red and green icons. I came to understand that those screens were showing the state of the devices (green is good; red is bad) across the bank’s network.
Whenever a device turned red, network engineers would scramble around to resolve the issue because it usually meant that the operation in one branch was disrupted.
That was my first experience with network monitoring solutions. As I have grown in my career, I have encountered several of these solutions from those that are open-source and free (e.g. Nagios Core, Zabbix), to those that are proprietary and commercial (e.g. ManageEngine OpManager, SolarWinds NPM).
In this article, we will be reviewing one of these monitoring solutions from ManageEngine. In the network/server/application monitoring space, ManageEngine offers a couple of products including:
- OpManager for Network monitoring. As a standalone tool, OpManager comes in 3 editions – Standard, Professional, and Enterprise. Licensing is done on a per-device basis (not per element or per sensor). There is also a free-forever edition that allows basic monitoring of three devices. An online demo is available here.
- Applications Manager for Server and Application monitoring. This also comes in three editions – Free, Professional, and Enterprise. Licensing is done on a per-monitor basis and the free edition comes with 5 monitors. An online demo is available here.
- NetFlow Analyzer (NFA) for Bandwidth and Traffic analysis. Licensing is one on a per-interface basis with the free edition allowing monitoring of up to 2 interfaces. Essential and Enterprise editions are also available. An online demo is available here.
- Network Configuration Manager (NCM) for configuration and change management. Like Applications Manager, this also comes in 3 editions – Free, Professional, and Enterprise. Licensing is done on a device basis and an online demo is available here.
- Firewall Analyzer for firewall configuration and log management. It comes in 3 editions – Standard, Professional, and Enterprise – and licensing is done on a device basis. An online demo is available here.
- OpUtils for IP address and Switch port management. This product is available in two editions – Free and Professional – and licensing is based on the number of IP addresses and/or switch ports. An online demo is available here.
All these tools are available as standalone products that can be purchased and installed separately. Combination options are also available. For example, you can get OpManager + NFA add-on + NCM add-on. Finally, you can get all these tools combined into one product known as ManageEngine OpManager Plus. For example, OpManager Plus 50 Pack includes license for 50 devices monitoring, 15 interfaces NFA add-on, 15 devices NCM add-on, 1 Firewall add-on, 250 IPs and 250 switch ports add-on. For this review, we will be looking at OpManager, starting with the installation of the software, followed by the discovery of devices in our lab environment, and then look at the different features of the solution in detail. Note: As much as possible, screenshots in this review will be from both our own installation and setup. In cases where we need to show features that are not available in our lab environment (e.g. due to a limited number of devices), we will take screenshots from the online demo of the product.
Lab Setup
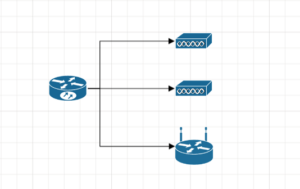
To review features like network discovery, alerting, and notification, we will be using the lab setup below:  This lab is built using GNS3 which allows us to emulate network devices such as routers and switches. The devices in the lab are as follows:
- SERVER is a Windows Server 2012 R2 machine spun up on Vultr. This is the machine that is running GNS3 and on which we will install OpManager.
- PC1 is just a VPCS host running in GNS3.
- L3SWITCH is a Cisco 3745 router with a switchport module installed.
- R1 is a Cisco 7200 router.
SSH with local database authentication has been enabled on the Cisco routers. SNMPv2c has also been enabled on these routers. Finally, there is connectivity among all devices on the network.
ManageEngine OpManager
With everything set up, let us get into the review of ManageEngine OpManager.
Pre-Installation
For our review, we will be downloading and installing our own demo copy of OpManager. This 30-day demo is available for free here and it allows you to monitor up to 1000 devices! Another cool thing? You can download the installation file without having to enter your email address (*coughs* SolarWinds). The size of the installation file for the current version 12.4 (as of the time of this review) is less than 200 MB. This is quite surprising, especially when you look at file sizes from competitors – over 2GB for SolarWinds NPM and over 700 MB for PRTG. Hardware and software requirements can be found here. It is largely dependent on the number of devices you want to monitor and also on the products you are installing but generally speaking, you need at least:
- 4GB of RAM
- 20GB of Hard disk
- Quad-core CPU
- Windows or Linux OS
Tip: Apart from open-source network monitoring solutions like Nagios, OpManager is one of the few network monitoring solutions that can be installed on Linux OS. Most network monitoring solutions support installation only on Windows OS which can increase the total cost of ownership when you consider Windows licensing costs. Tip: There is also an online demo that you can access easily here. This demo has prepopulated devices.
Installation
Installing OpManager turned out to be very easy, just a couple of “Next…Next” screens. There was no pre-installation check to verify if system requirements are met but we don’t know if that happened behind the scenes.  Using the default configuration (i.e. default ports, bundled POSTGRESQL database server), the installation took less than 1 minute! Upon completion, the OpManager server was automatically started, and the web interface opened on http://localhost:8060. The default username and password is “admin”.

Upon the first login, you will be presented with some steps to get started, such as adding devices, configuring alerts, etc. You can quickly set up monitoring by running through these steps. 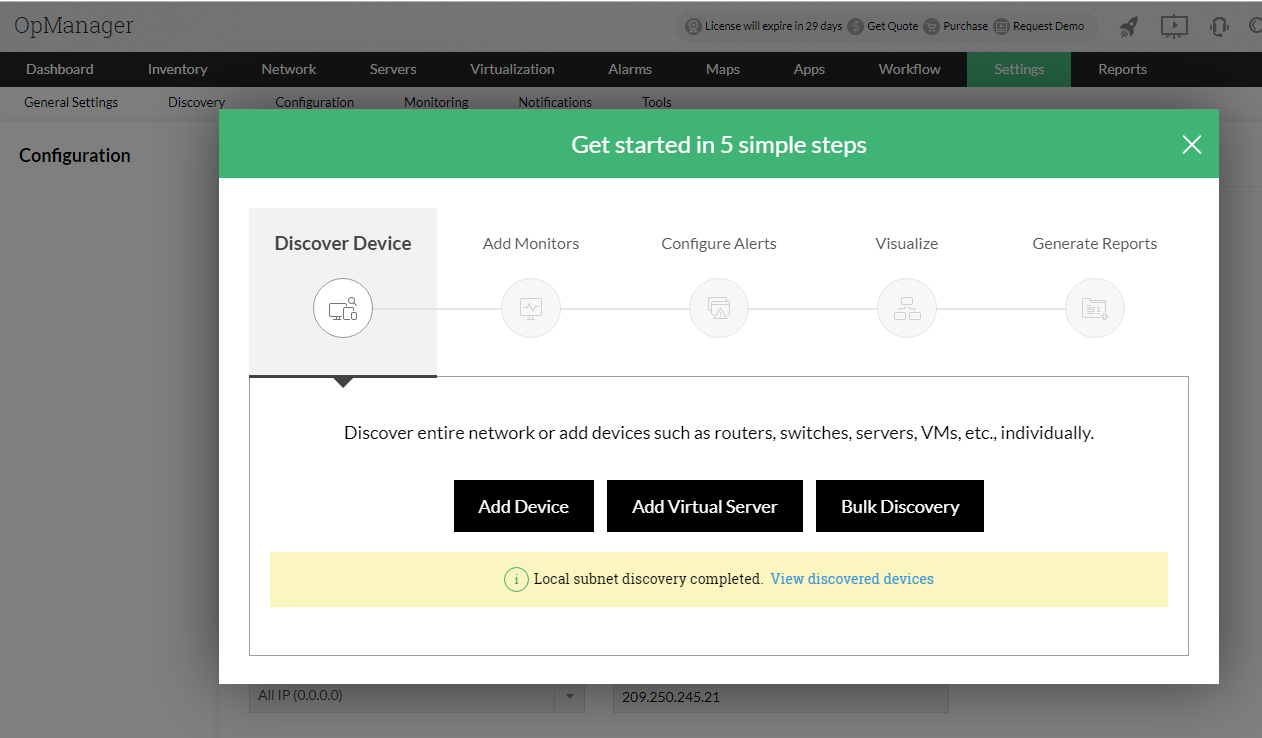 For this review, we will bypass these steps and go to the Dashboard which is where you will be placed upon subsequent login. This dashboard is highly customizable so that you can see what is most important to you.
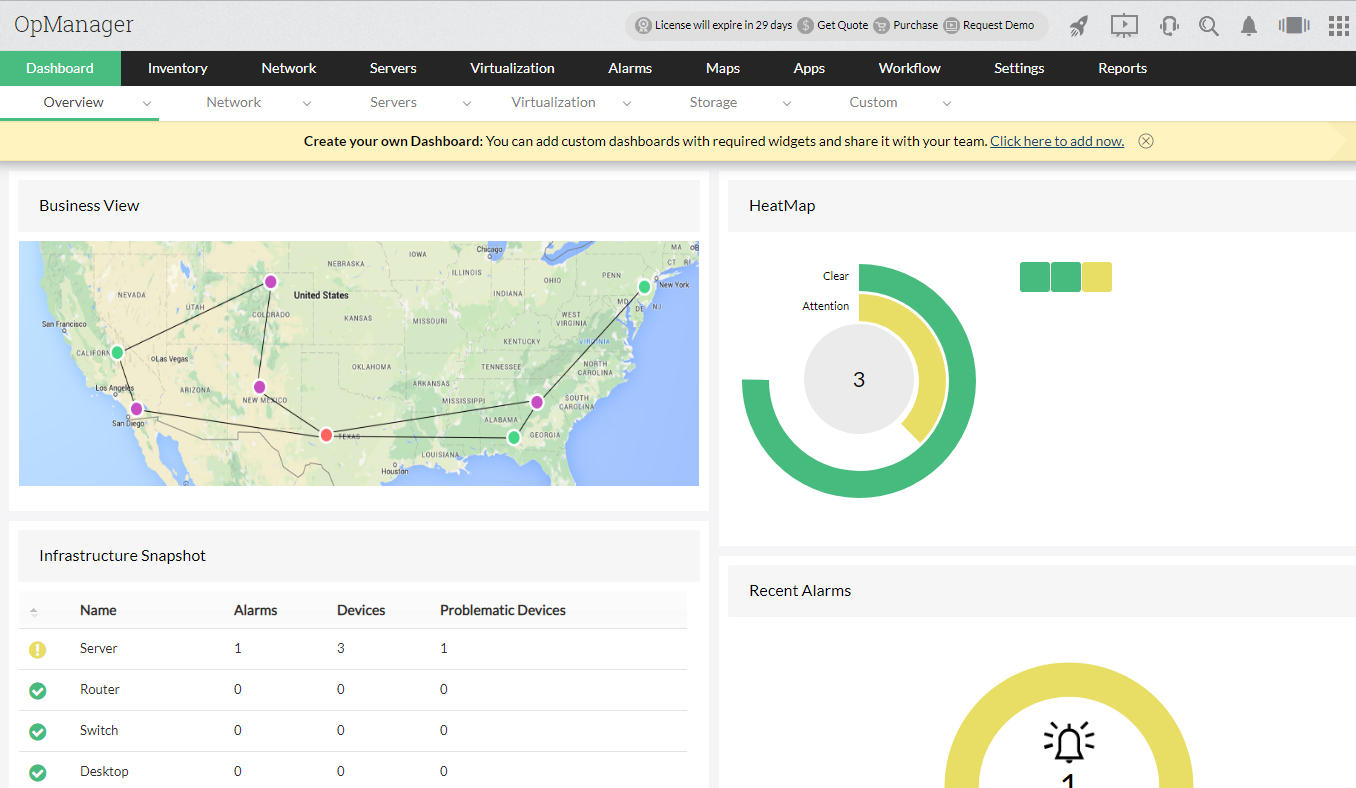
Network Discovery
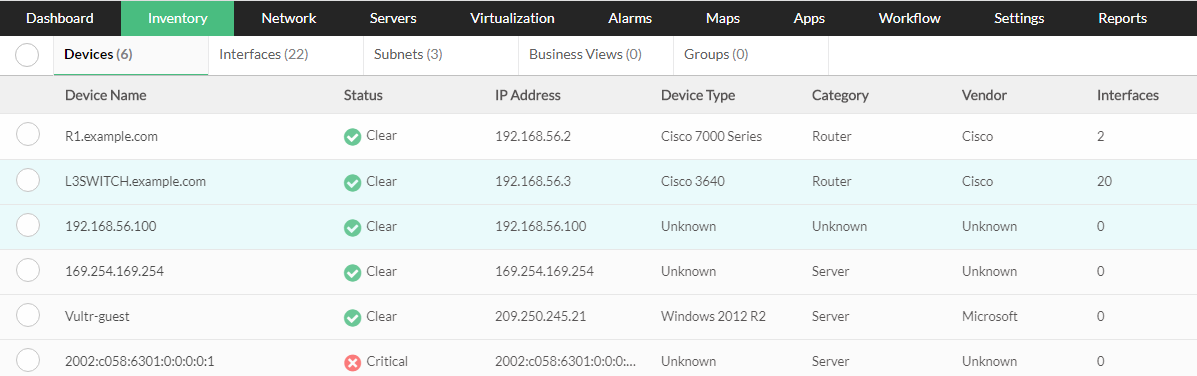
The purpose of any network monitoring solution is to monitor actual devices and/or applications. The question is: “How will the solution know what to monitor?” One of the ways this happens is through Network Discovery. Basically, the tool will scan the network and try to add them to its inventory using configured credentials. By default, OpManager adds the device on which it is installed to its inventory. In the case of a Windows Server, it uses the local server Windows Management Instrumentation (WMI) credentials to monitor that server. OpManager also performs a default local network discovery upon installation. In our case, it has discovered three (3) devices. We can view these devices by navigating to Inventory > Devices: 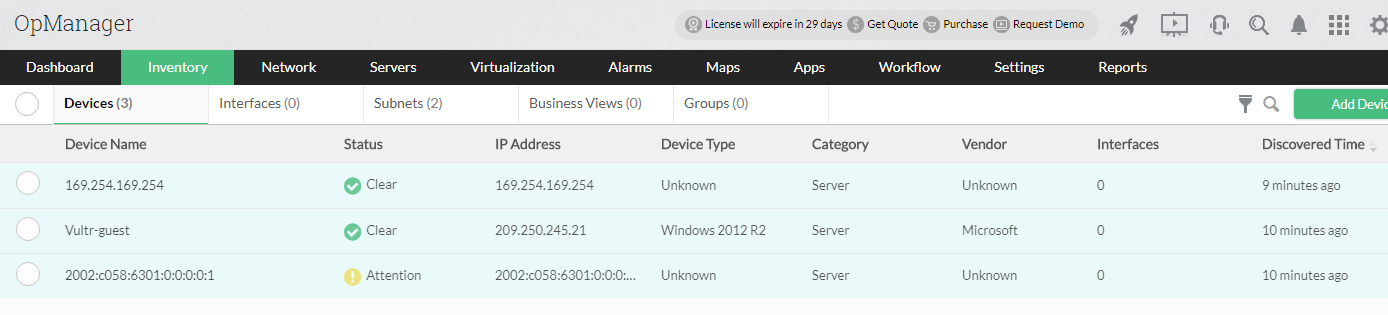 Note: Since this is a virtual machine in the cloud, we don’t have control of the two other discovered devices. Before adding the other devices in our lab network, we will specify the default credentials that OpManager will use to discover devices. This can be done from Settings > Discovery > Credentials > Add Credential. Credential types include SNMPv1/2c/3, WMI, Telnet/SSH, Citrix, and so on.
 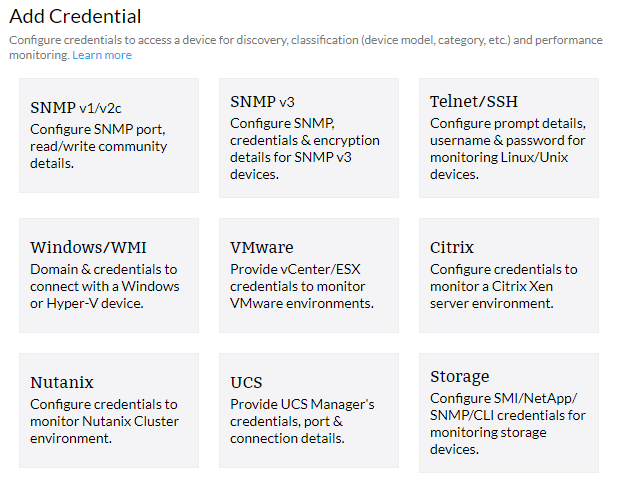 In our case, we will specify SNMPv2c and SSH credentials.
 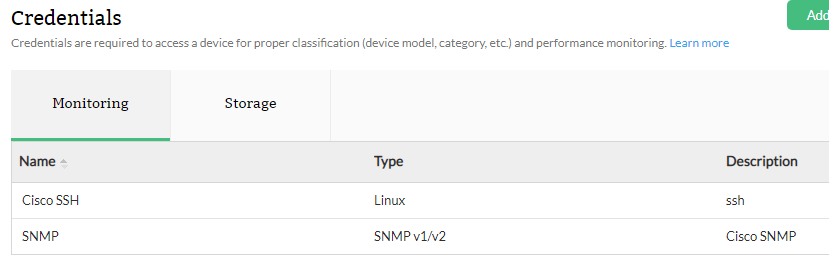 With our credentials set, we can now add devices to be monitored. This can be done in several ways in OpManager including:
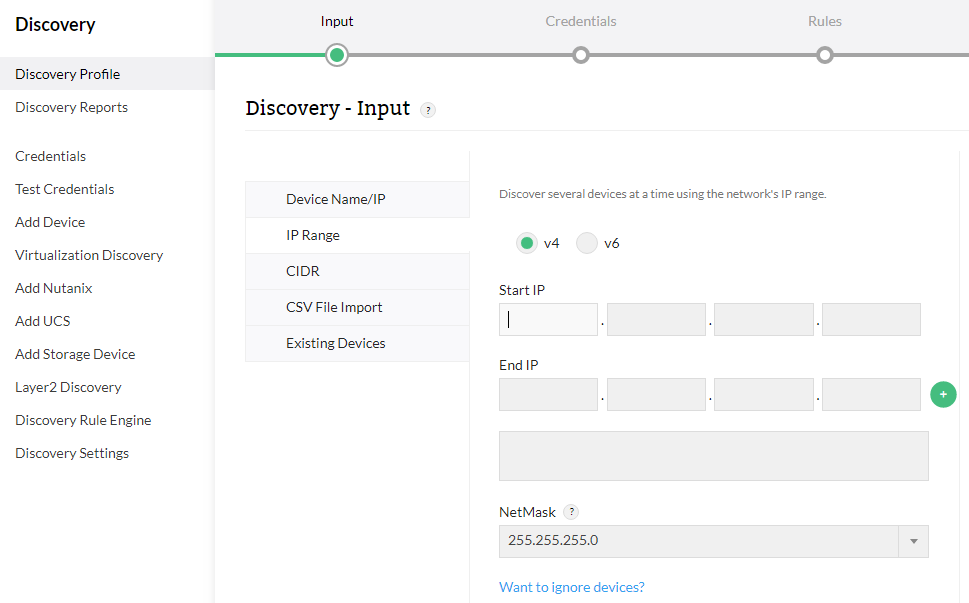
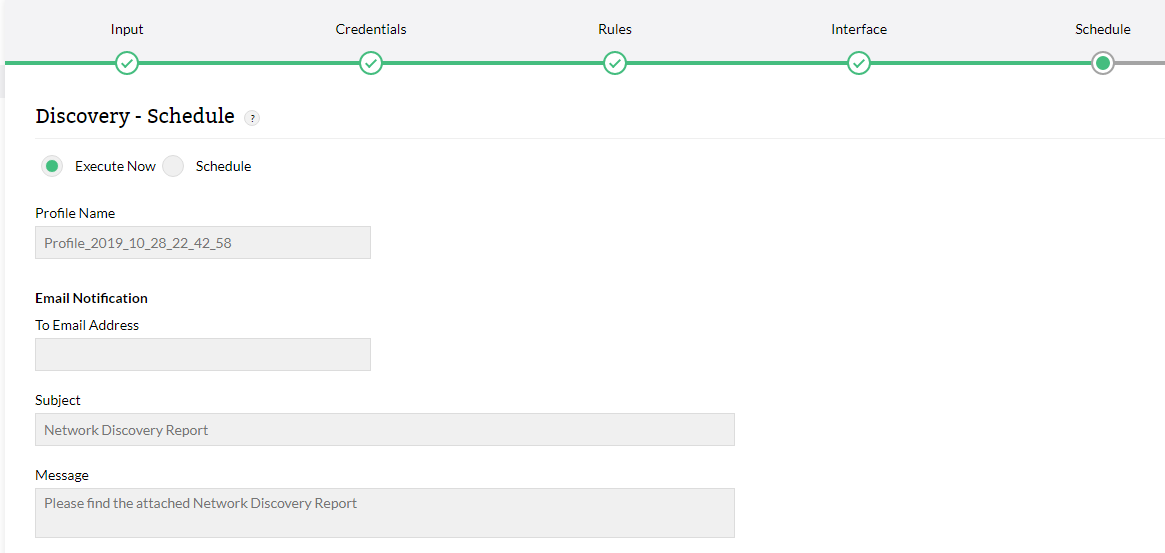
- Run a network discovery: You can specify a single IP address or device name, IP address range, CIDR, or even upload a CSV file. You can also specify discovery filters so that certain devices (e.g. IP range) are ignored. Discoveries can be run once or scheduled to run often.
- Layer 2 discovery of network: You can specify a seed device to start discovery from and then using details from protocols like CDP, OpManager can map out the network. Once the network has been mapped, you can import the devices into the inventory.
- Manually add a single device
 As the discovery runs, there is a little pane at the bottom right that shows the status of the discovery:
 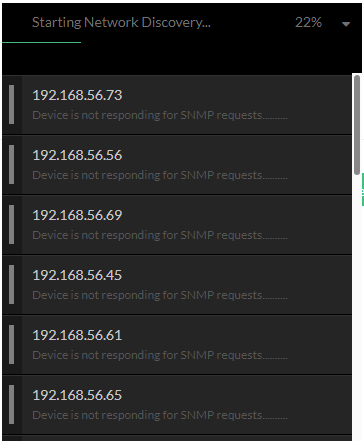 Downside: We added discovery filters to ignore certain devices. However, it seems OpManager still tried to contact those devices via SNMP. When the discovery is complete, there is a link on this status bar that can take you to the inventory:
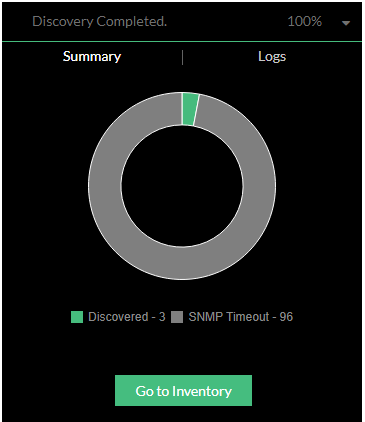
 Note: Notice that even though the PC1 (192.168.56.100) is a “dumb client” with no SNMP or SSH credentials, OpManager has discovered this device using just ping.
Inventory
Apart from viewing all devices in a single inventory dashboard, we can also view the inventory for specific device categories such as Network, Servers, and Virtualization. 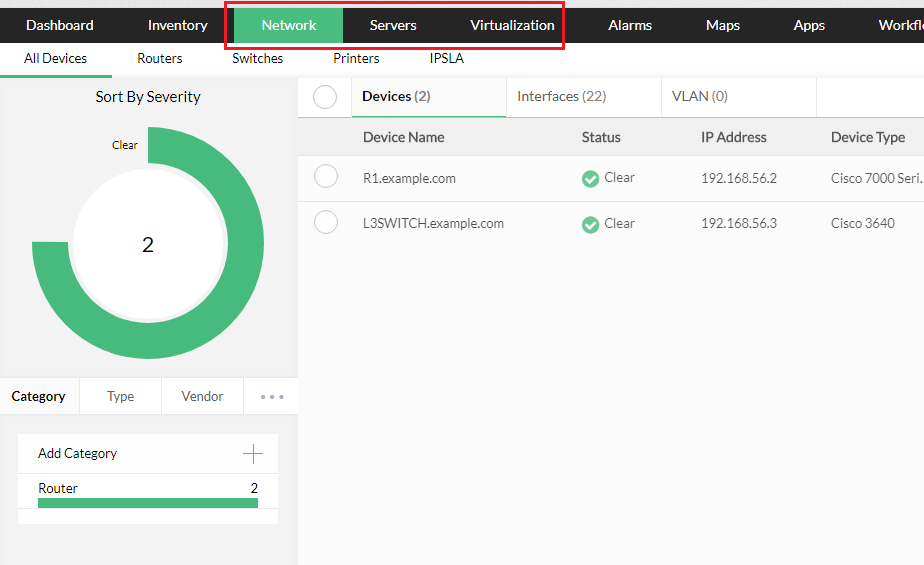 Under the device-specific inventory, we can group devices in different ways like Category (e.g. Router, Firewall), Type (e.g. Windows 2008, Windows 2012), Vendor (e.g. Cisco, HP), Apps (e.g. Exchange), and Protocols (e.g. SNMP, WMI)
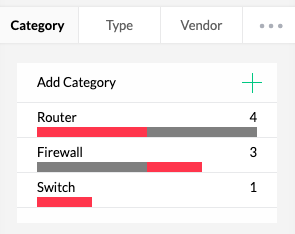
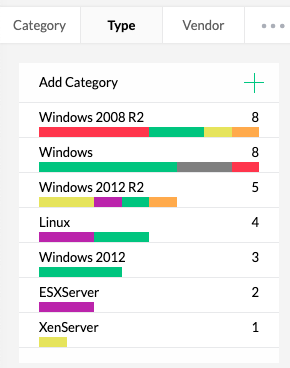 Note: The grouping images above are from the online demo provided by ManageEngine.
View monitored data
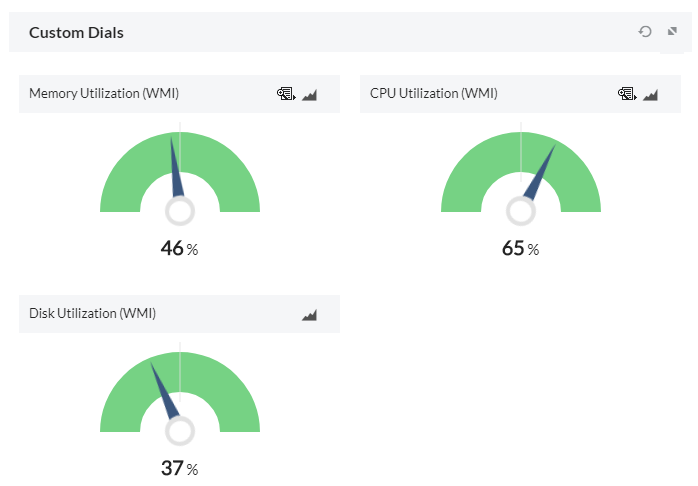
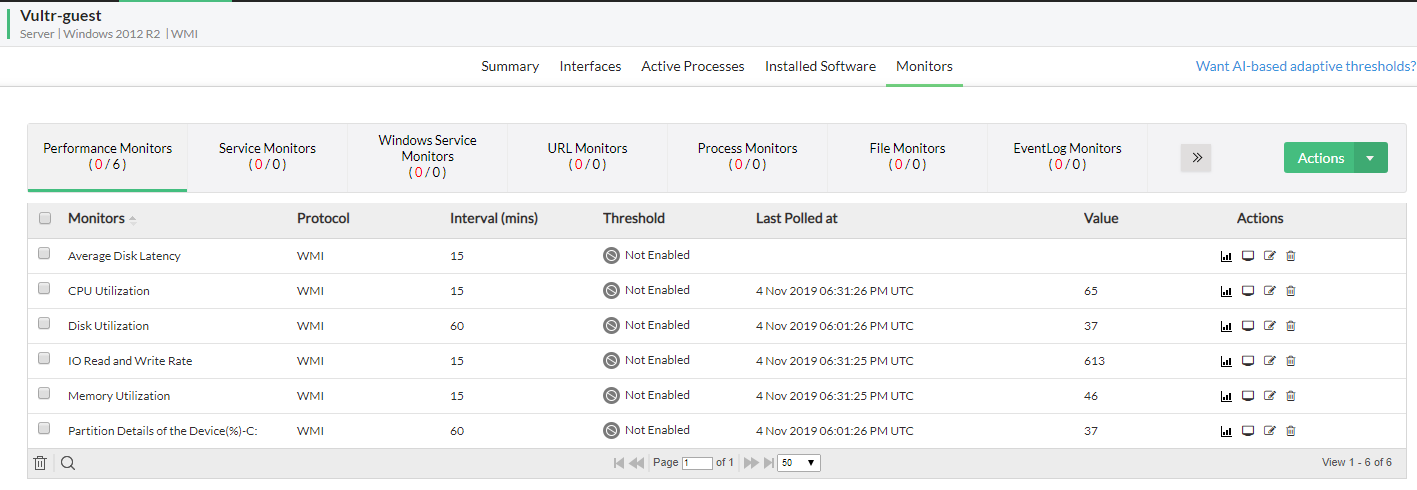
Once devices have been added to the inventory, monitoring for that device is automatically enabled based on a set of “Monitors”. A monitor reports on a specific item such as memory utilization, CPU usage, disk utilization, and so on. There are also monitors for hardware (e.g. power, temperature, etc.) and interfaces (e.g. utilization, error rate, etc.). You can view the list of monitors and also add monitors by navigating to Settings > Monitoring. For example, let us look at the monitoring details for the Windows Server (just click on it): 
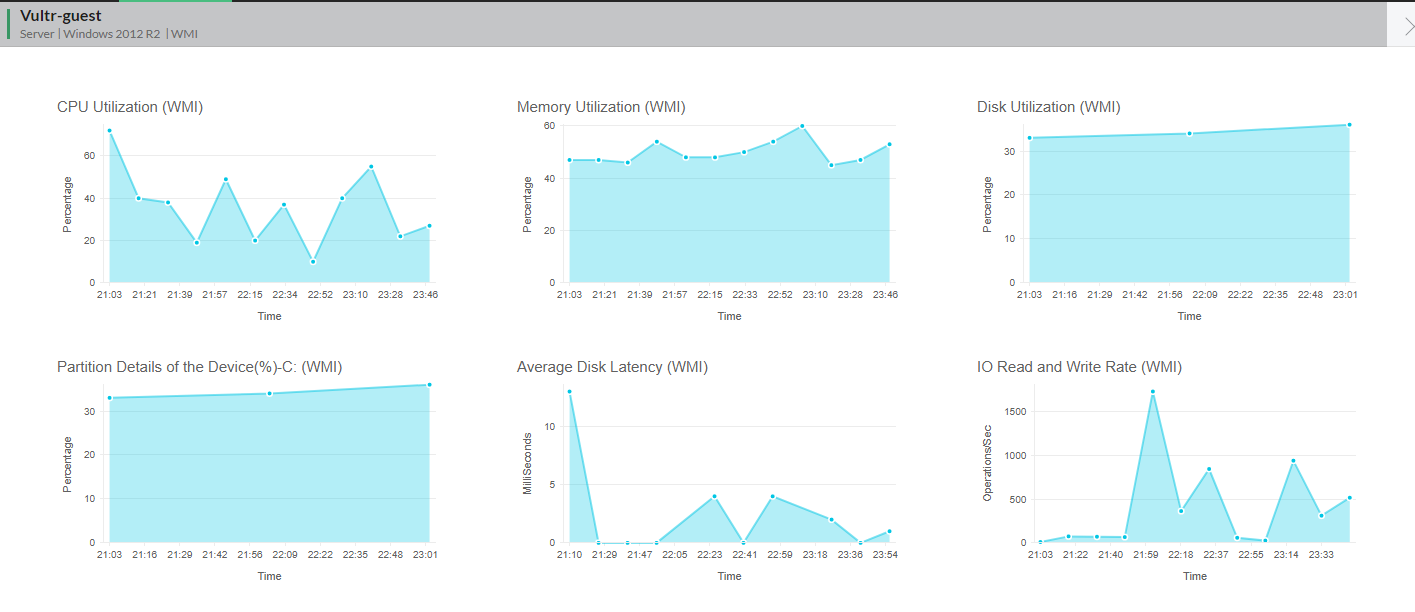
 There are a couple of cool things you can do when viewing devices. The first is the Graphs feature which gives you nice graphs for the monitors on a device:
 ![]()
 Another cool feature is the level of detail available for interfaces. The screenshot below shows the interfaces on R1:
 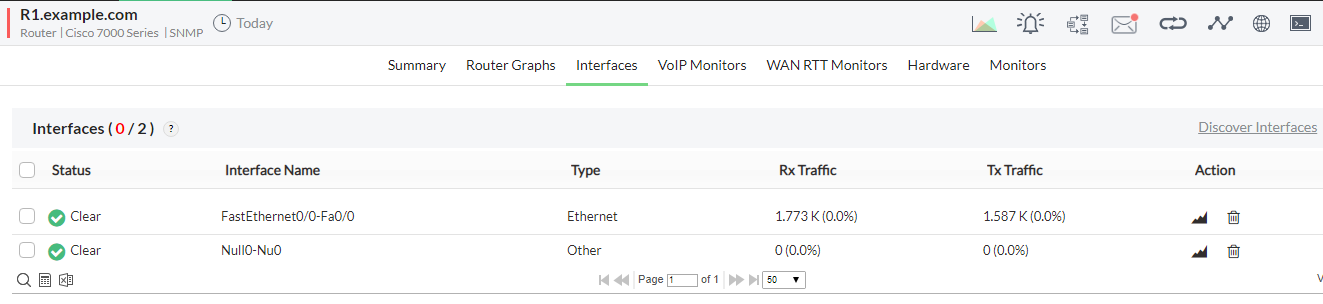 You can even view real-time traffic on an interface:
 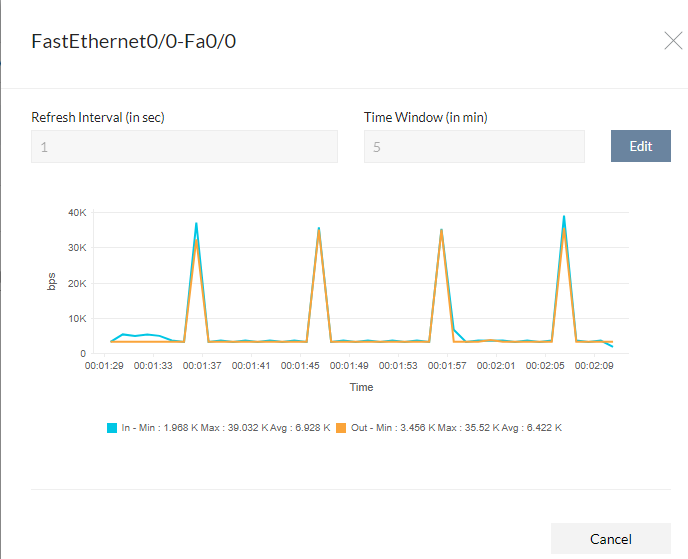 The last cool feature we will highlight here is the fact that even interfaces have their own dedicated monitoring page, complete with graphs and monitors:
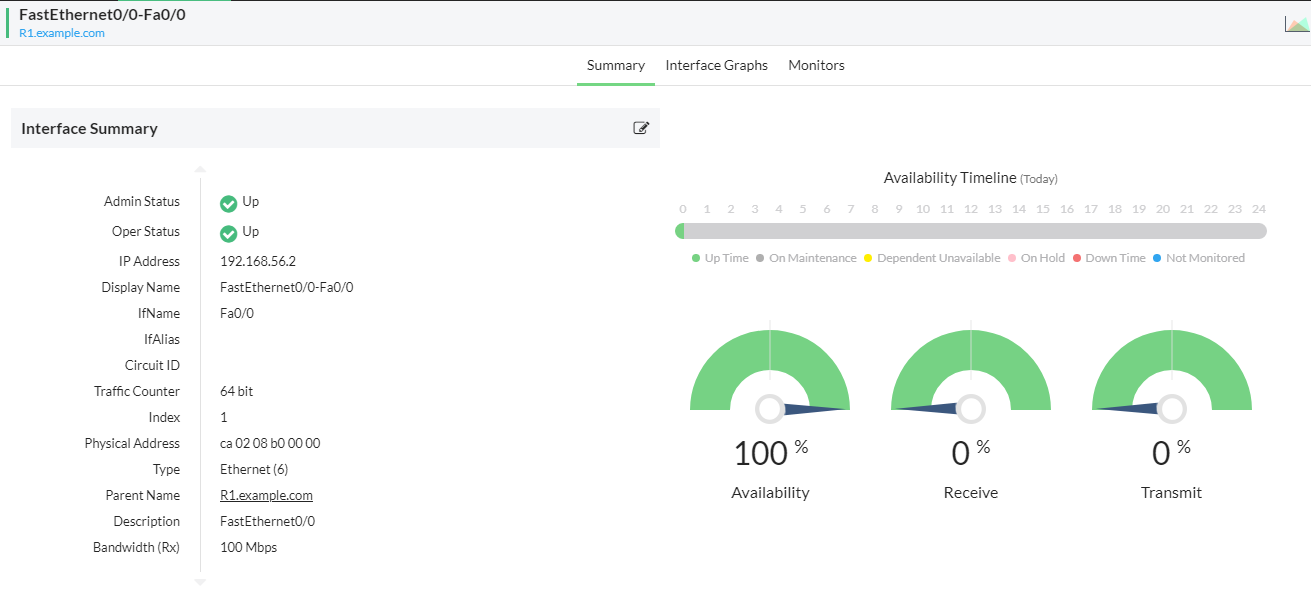
Templates
You may be wondering, “How does OpManager know which monitor to add for different devices?” The answer can be found in its concept of Templates. Basically, OpManager comes with a predefined set of templates for device categories (e.g. router, server, etc.), vendors (e.g. 3Com, Cisco, etc.), device types (e.g. Cisco 3640 router), and even interface types (e.g. Ethernet). Monitoring options and rules are defined for these templates making monitoring more or less automatic. You can view a list of templates by navigating to Settings > Configuration. These templates can be edited and you can also add your own templates. 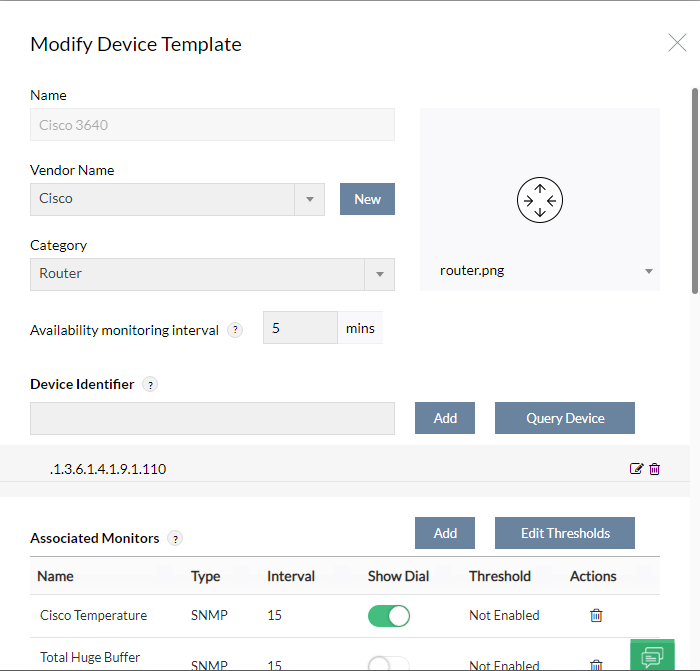 Upside: Since OpManager is licensed per device, adding all these monitors for a single device does not count against you – it is still one license. This is unlike other monitoring solutions that license per element (e.g. interface) or per sensor.
Alarms
Just like the story of the bank’s network operation center that I mentioned at the beginning of this review, there’s an alarm interface available on OpManager. Here, you can view the alarms on the network sorted based on category (e.g. router, server) or severity (e.g. critical, attention). Alarms can also be filtered based on the time they occurred. 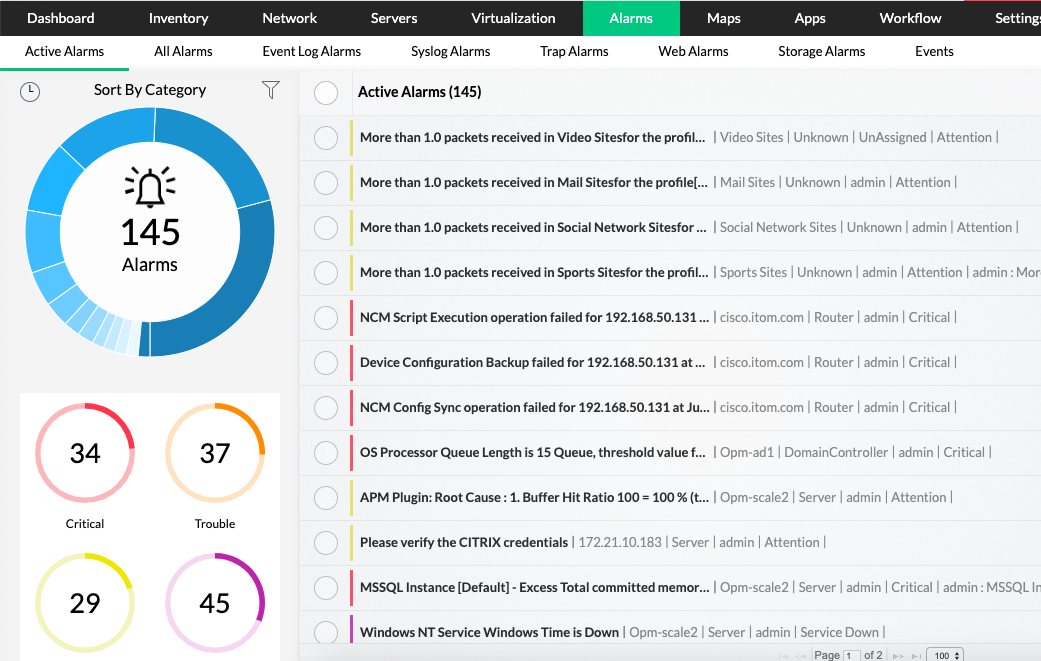 Downside: We found the “Sort By Severity” and “Sort by Category” somewhat confusing because it seemed like they work in a flipped manner. However, we discovered that sorting controls the pie chart. You can click on an alarm to view details about that alarm and also perform some actions such as executing a workflow, triggering an action (e.g. notify someone), edit thresholds, and so on.
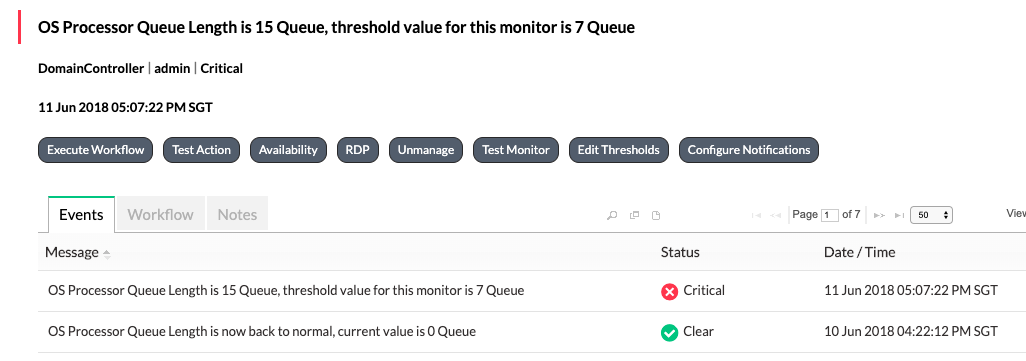
Notifications
Apart from viewing alarms via the web console, OpManager can be configured to notify administrators of problems via different channels like email, SMS, chat (integrate with Slack), and even logging a ticket (integrate with ServiceDesk Plus or ServiceNow). This can be done by configuring a notification profile (Settings > Notifications > Add Profile). 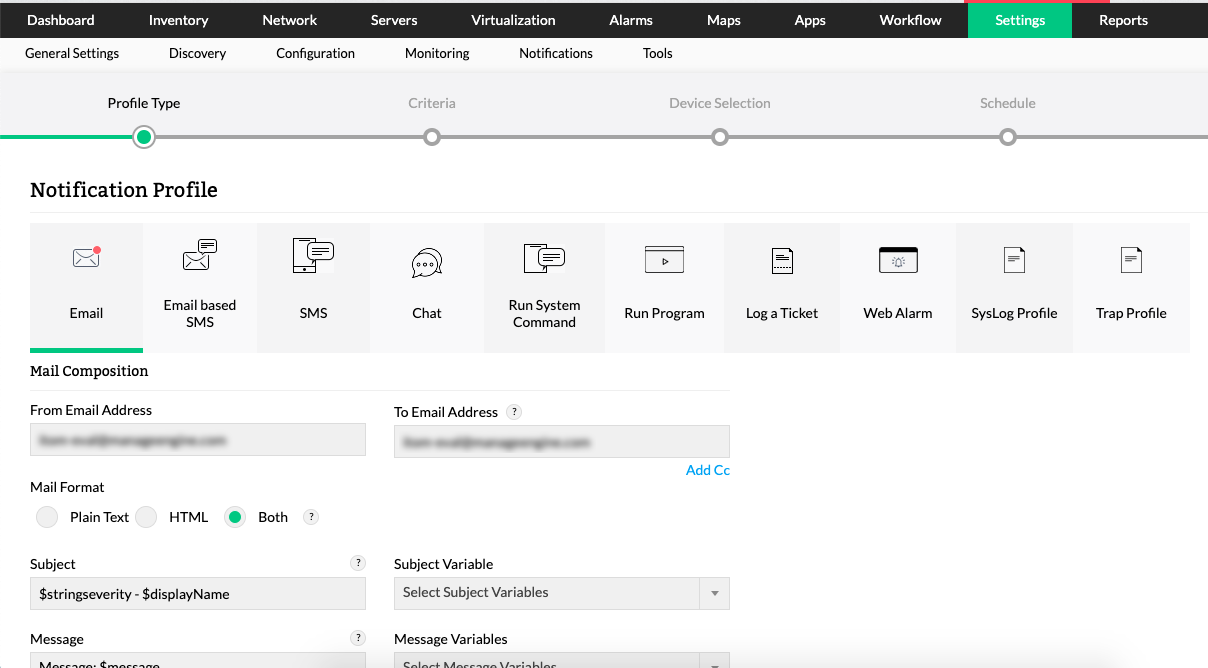 To test notification, we configured SMTP settings on OpManager and created a notification profile for R1 such that when the device goes down, an email is sent. To simulate that the device is down, we just shut down its interface. We received the email below:
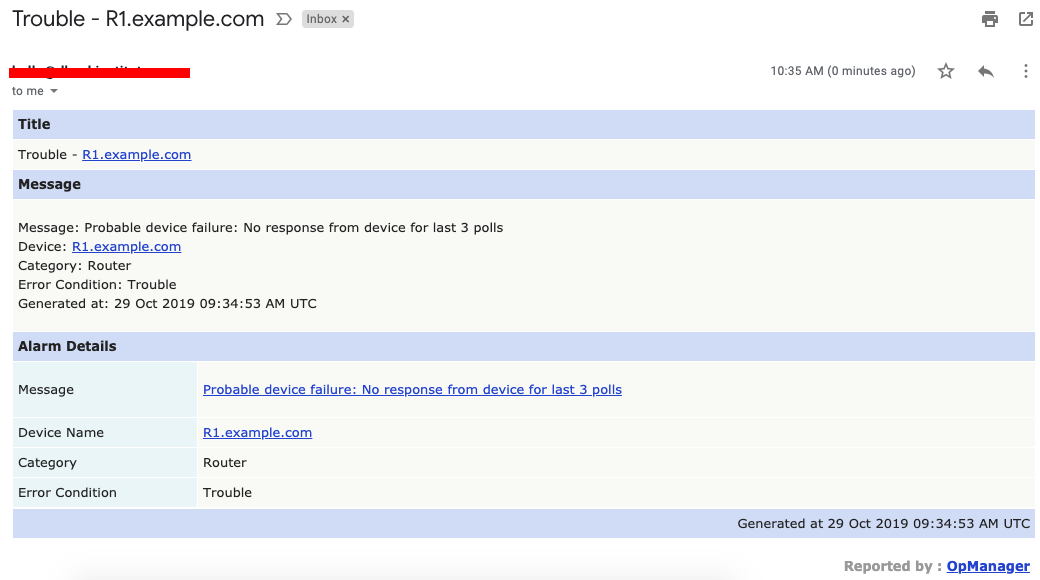
Reports
OpManger provides very useful reports that can be viewed, scheduled, exported, and even emailed. There are predefined report categories (e.g. Health and Performance) and templates (e.g. Devices by Response Time). Apart from these templates, you can also define your own reports. 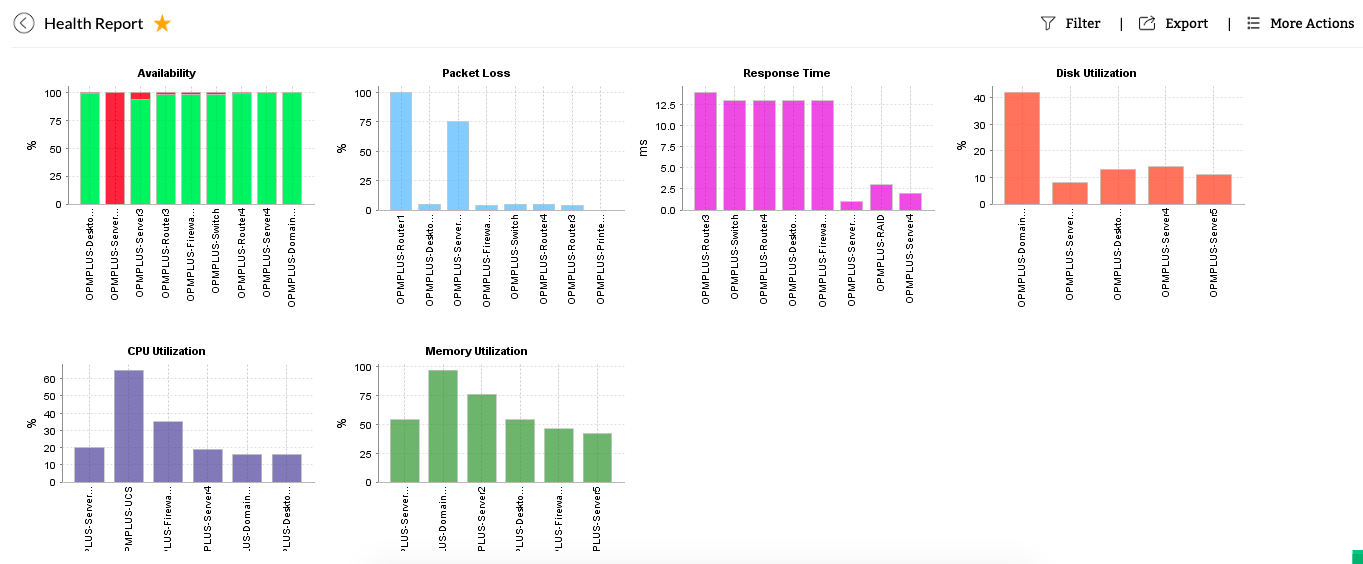
Other Features
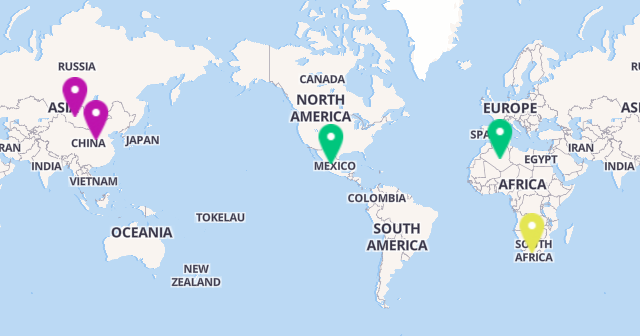
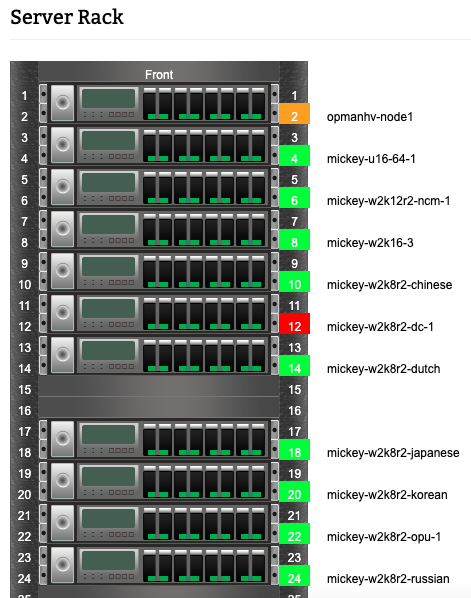
Before we end this review on OpManager, let us look at two other interesting features – Workflow and Maps. Workflow is basically a way to automate certain actions based on different criteria. For example, the workflow shown below runs daily and checks the folder size on an SQL server; if the folder is larger than 1GB, files older than 7 days are automatically deleted. 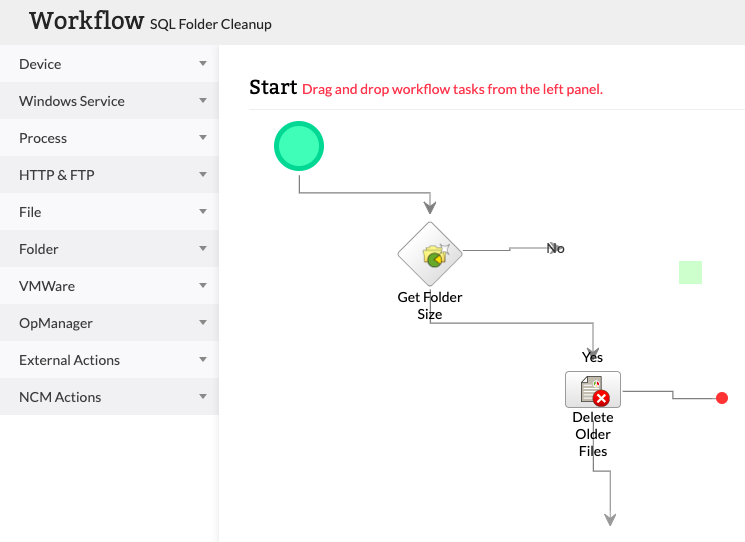 Maps provide a visual representation of devices based on different requirements such as business needs (Business Views), geographical location (Zoho/Google Maps), datacenter visualization (3D floor views, Rack view), and Layer 2 Maps.
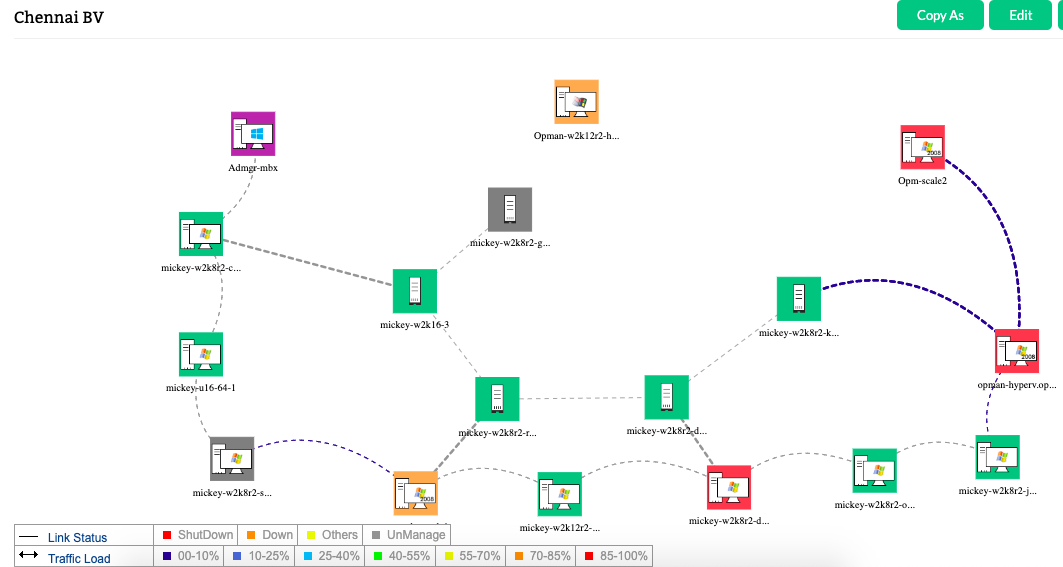
Verdict
In general, we were pleasantly surprised by ManageEngine OpManager. From the ease of installation to the device/interface monitoring templates, OpManager removes the hassle from setting up a monitoring solution. The fact that licensing is also based on a per-device basis means that you don’t have to worry about adding as many monitors that you need for a device. Finally, the interface is intuitive and does not feel bulky at all. On the downside, the OpManager interface can do with “breadcrumbs” to help easier navigation. As you go deeper into the details of a device, you can get “lost” and may have to go all the way back to the main dashboard to find your way back up one or two levels. This would be a nice improvement for the next versions. Having read this review, will you be trying out (or buying) ManageEngine OpManager or one of the add-ons? We will like to hear from you! You can also view this page for pricing information.